Differences Between Apple & Pine Seedlings

Although apple (Malus spp.) and pine (Pinus spp.) Seedlings share the identical basic functional components, their structure and arrangement are different, as are the methods that the seeds are produced. The components that the seedlings have in common are a seed coat, a seed root referred to as a radicle, and a stem called a hypocotyl. Their seed leaves vary markedly in form and number. These differences reflect the reality that pines and apples aren’t closely related. All these are seed plants, but pine is a gymnosperm and apple is a flowering plant with two seed leaves, or a dicotyledonous angiosperm.

Seed Origins

The fundamental differences between pine and apple seedlings begin with the seeds that make the seedlings. Pine seeds develop in a bract of the female pine cone, and aren’t surrounded by a fruit. Apple seeds develop within the ovary of the apple flower, enclosed with a hexagonal wall that grows into a fruit. Many pines have small winged seeds designed for wind dispersal, but about 30 of the 110 species have heavy seeds built for animals to propagate. In apples, the fruit becomes eaten and the small, hard seeds pass unharmed through an animal’s digestive tract.

Within the Seed

Both pine and apple seeds have a plant embryo that develops to the seedling. Pines have an elongate embryo in the middle of the seed surrounded by a thick layer of nutritive substance. Apple seeds are largely taken up with 2 big seed leaves and also a thin layer of nutritive endosperm, which differs in origin from the nutritive layer of pine tree seeds. The embryonic tissues that become the the radicle take up relatively little room toward the base of the seed.

Seed Germination

Germination in both pines and apples starts with the emergence of the radicle, which anchors the developing seedling and harvests nutrients and water so it can grow. In pine seedlings, the radicle splits the seed coat since it emerges, with the mineral substance surrounding the embryo supplying the energy for development. In apple seeds, then the stored nutrients in the cotyledons fuel seedling growth until plants begin to make their own food through photosynthesis. Apples and pines both require a period of moist cold in order to germinate, and also both apples and pines are hardy in U.S. Department of Agriculture plant hardiness zones 3 through 8.

Seed Leaves

The amount of seed leaves in pine seedlings varies from 2 to many, depending on the species. Ponderosa pine (Pinus ponderosa), which grows in USDA zones 4 through 8, has anywhere from six to 12 cotyledons. The cotyledons are very long, narrow and stiff, reflecting the needle-like form of their true leaves to follow. They’re arranged in a whorl around the stem of the seedling. Apple’s seed leaves are oval and fleshy-looking, arranged opposite each other at the tip of the seedling stem.

Seedling Development

True leaves emerge as the seedlings grow. In pine seedlings, needle-like true leaves appear together with the growing shoot above the cotyledons. As the tree grows, it starts to create the leaves in bundles, called fascicles, which can consist of from one to eight needles, depending on the species. In apples, elongated oval true leaves with jagged edges emerge as the apical shoot grows from between the two cotyledons.

See related

Fertilizing African Violet Plantlets

African violet (Saintpaulia spp.) Produces plantlets from divided plants and leaf cuttings. Normally grown as houseplants, African violets are tropical perennial plants, and maybe grow outdoors in U.S. Department of Agriculture plant hardiness zones 11 through 12. Flower colors range from white through pink and fuchsia into blue-violet, and plants grow 6 to 16 inches wide, depending on the range. African violet plantlets require only small quantities of fertilizer.

In the Soil

Specialized potting soil feeds fresh African violet plantlets. Small plantlets from African violet leaf cuttings and divided plants don’t require fertilizer. When transplanting plantlets into new pots, use a specialized African violet potting soil, which prevents over-fertilization. African violet potting soil is slightly acidic and contains enough nutrients to feed the plantlets while they build their root systems. Fill 2- or 2 1/2-inch pots using 0.21-0.11-0.16 potting soil, and plant the African violets in order that their lowest leaves have been just above the ground. Water the pots and then let them drain thoroughly. Always use pots with drainage holes.

Little by Little

Applying just a small fertilizer when African violet increase slows down supplies all their requirements. Over-fertilized African violet plantlets grow poorly. New leaves on over-fertilized plants look hardened, as well as the plants develop tight centers. To prevent over-fertilizing plantlets, wait till their growth goes down and look for signs of yellowing old leaves, but be careful — plantlets that get too much lighting can develop the same symptoms. If you are unsure whether your African violet plantlets require fluid, fertilize one or two. If the leaf colour and increase improves, fertilize another plantlets. African violets need bright, indirect lighting, like a place about 3 feet from a southeast- or west-facing window.

Feeding Time

Watering and fertilizing African violet plantlets usually occurs at the same time. African violets are susceptible to crown and root diseases caused by excessively moist potting soil, so don’t water the plantlets until the ground is dry to the touch. Dilute a 7-7-7 African violet fertilizer at a rate of 7 to 10 drops per 1 quart of lukewarm water, and apply the mixture to water the plantlets, or apply the fertilizer based on the manufacturer’s directions. Either stand the pots in 1 inch of fluid mixture and lift them out when the soil surface is moist, or pour the mixture into the pot until it looks through the drainage holes. Don’t receive any of this solution on the leaves. Catch the watered pots to drain thoroughly before replacing them on their own drip trays. African violets usually stop growing in winter. Water the plantlets in order that the potting soil surface is just moist, and don’t apply fertilizer.

Care Package

African violet plantlets prosper when conditions are correct. Nighttime temperatures between 65 and 70 degrees Fahrenheit are ideal for African violets, but plantlets grow anywhere in the assortment of 60 to 80 F. Growth slows down and flowering is reduced when temperatures are too high or too low. Chilled African violets turn dark, become water-soaked and wither. Put the pots in their drip strips to a flat container of sand or gravel full of water to give a humid atmosphere around the plants. Don’t allow plants to stand in water, and don’t drip water on their leaves because this causes unsightly spots.

See related

The Way to Grow Ornamental Kale Sunset

It will not cut once you’ve discovered ornamental kale. This cool-weather plant provides big, leafy rosettes of purples and brilliant pinks , offset by green or ivory. Long-stem varieties are more eye catching, with roselike centers you can accentuate through trimming — a favorite in fall floral structures. The decorative kale cultivar Sunset (Brassica oleracea”Sunset”) is a long-stemmed variety that can reach 24 inches tall and features deep pink”blossoms” with green outer leaves, sometimes streaked with pink. Like Sunset, it’s best to begin with seed in midsummer while kale seedlings are available each autumn, when you’re looking for a specific cultivar.

Fill flats with sterile seed-starting mix when day temperatures are around 70 degrees Fahrenheit and it is at least 75 days before temperatures are regularly below 50 F. This will be about mid-August, but assess by your particular climate or microclimate.

Sow seeds 1/4 inch deep and gently cover with all the mix. They can be kept outdoors provided that the temperatures are warm and you keep them moist. Ornamental kale seeds must germinate within 10 days at a temperature of 70 F.

Transplant the strongest, most appealing seedlings to 4-inch pots filled with potting soil around a month after they germinate. Water well. Use a soil with plant foods or fertilize with a balanced fertilizer.

As day temperatures start to dip near 60 F clear weeds and summer annuals from an area of well-drained soil in full sun. In accordance with University of California Extension, this really is from early October through November depending on where you are. Until temperatures cool, the plants don’t start to show their true colours and colour can take up to a month.

Dig holes equal to the root chunk of each plant in full sun in their final place as evening temperatures fall toward 60 F. Space the holes six inches apart. While ornamental kale needs 10 to 12 inches between plants to achieve it summit, tight spacing promotes the stalks of types like Sunset to elongate.

Add a handful of slow-release fertilizer and pop a plant. Business up the soil and water well. Keep the plants moist as they set in their new location.

Remove leaves of Sunset ornamental kale beginning when the plants are 6 inches tall, so lasting as they grow till they have a reddish to deep pink center with one outer layer of green to pink-streaked green leaves and a stem. It may take up to completely develop.

Stakes and tie stalks to supports once they reach 10 to 12 inches. Sunset has rosettes from 3 to 7 inches across and may grow to 24 inches tall, so though stalks are fairly sturdy, supports keep the top-heavy plant from flopping over.

Fertilize once a month with a balanced, water-soluble fertilizer. While established practice is to cease fertilizing once the plant begins to colour, as it may keep color from developing this may not be the situation. Research conducted for farmers by North Carolina State University showed that when the plant has feedings the plants can suffer from nutrient deficiencies if fertilizer is stopped and demonstrate no difference.

See related

How to Prep Your Ground for a Healthy New Lawn

Low-maintenance lawn alternatives are growing in popularity, but many homeowners still love a little bit of turf grass — yards make great areas for entertaining; children can play along with pets can operate on them. However, what if you have to put in a new yard or start over if your current yard is past its prime? Is this a great DIY project for someone with average skills? As it happens, yes. However, just like the majority of things, a thriving yard starts with the ideal preparation.

Samuel H. Williamson Associates

Materials and tools:
Soil testSod cutterHoeTillerHard rakeSpreaderSoil amendmentsFertilizer

How to Prep for a New Lawn

1. Test your soil.
The only way to learn what’s on your soil (and what’s not) is to test it. For about $15, you can have a sample of your soil tested at your regional county extension office. There are fundamental kits available for you to conduct a test, but your extension office will have the ability to give you more extensive info about what’s going on with your own soil, so it is money well spent.

A good soil test will tell you what your soil pH is; what kind of soil texture you’ve got; the comparative quantities of nitrogen, phosphorus and potassium; and quantities of other minerals like iron, calcium, magnesium and copper. Once you have this info, you can amend your soil properly to prepare it to your new yard.

Photo by Ryo Chijiiwa

Jocelyn H. Chilvers

2. Remove present grass weeds and plants. Starting out with a fresh slate is important — you don’t wish to spend time and money on a new yard if you are simply placing it on top of a weedy area. The way you eliminate this undesirable material is up to you, and largely depends on how big the area is and what kind of plant material you’re going to be removing. For small areas having old weeds and grass, a hoe will work nicely, but for larger areas consider renting a sod cutter (normally $70 per day). If you’ve got big plants (shrubs, woody perennials), remove them first and decide if you want to replant them in another area or transfer them into a compost pile.

3. Loosen the soil with a tiller. This is an optional step, since there are a couple of schools of thought concerning tilling your own soil. Some specialists believe tilling is required to completely combine old dirt with amendments; others think tilling simply disturbs weed seeds and produces a mess. My recommendation is that if you’ve got a place of very hard dirt, it might make sense to break it up to a thickness of 6 to 8 inches utilizing a rear-tine tiller (normally $55 daily to lease) before incorporating your soil amendments, but otherwise feel free to omit this step.

Photo by Flickr Commons user Topslakr

decordemon

4. Add compost. All lands, regardless of the results of a soil test, can benefit from a 2- to 3-inch use of compost. This is sometimes compost taken from your pile or bought from a landscape supply yard. Use well-rotted mulch, as compost that is too new or “warm” won’t be broken down and won’t benefit your new yard. Good-quality compost costs about $30 to $50 per cubic yard, depending on the kind you purchase along with the area in which you live. Make sure you distinguish the landscape supply yard which you need it to set a new yard, since there are often different combinations for various backyard software.

You can also put in other soil adjustments, such as sand, to break up clay-like lands. Soil amendments tackle the soil’s physical state (feel, ability to drain), and are not to be confused with fertilizers, which tackle the nutrient amounts in the dirt.

Noelle Johnson Landscape Consulting

5. Add fertilizers and rake smooth. Based on the results of your soil test, you might elect to add some starter fertilizers to get your lawn off to a good start. Your soil test should make some recommendations on what to add to bring your particular soil up to healthful nutrient levels; search for a lawn starter fertilizer with those components. If you have any questions, make certain to ask your county extension office for clarification to avoid performing any unnecessary actions or steps.

Use a spreader to add the compost evenly, then use a hard rake to evenly smooth the surface of your soil. You’ll want the dirt to be approximately 1 inch below grade to permit for the elevation of the installed bud. Ensure that your soil surface is totally free of “hills and valleys,” which will make for a lumpy lawn along with a less-than-professional look.

Koch Architects, Inc.. Joanne Koch

Plant sod or spread grass seed as soon as possible after completing your prep work. The longer your unplanted soil is bare, the faster weeds will once again stake their own claim.

Special considerations:
Every geographic area has its dirt quirks — too much rock, sandy soil, clay dirt etc.. Get to know so that you can better tackle your gardening issues.Don’t skimp on soil planning when planning for a new yard — even though you won’t find the specific materials in the end, a healthy lawn will be your reward.Always use sod or grass seed that is suggested for your region and your website. More:
5 Great Grasses for a New Yard
Getting Along With Less Lawn
The situation for Losing the Traditional Lawn

See related

Fantastic Garden Combo: A Fall Landscape Scene That Lasts

Fall is one of the most exciting seasons in the backyard, when we can benefit from the many autumn foliage superstars to make a frame for late-blooming perennials. As opposed to thinking in terms of picking a favourite flower or two, make a vibrant vignette of trees and shrubs which will span the seasons and offer your garden a picture-perfect appearance in autumn.

When decorating a space, we generally start by choosing a wall color. With that in place, the fun starts as we locate the perfect floors or accent rug prior to finally think about the placement and style of furniture. The total color palette can be kept restrained, with attachments providing the finishing touch and extra color punch.

Creating a backyard vignette is a little like that. Start by choosing the key vertical elements — picking the trees which will look great over many seasons but that also have wonderful autumn tints. For the floor plane, search out grasses and shrubs which bring color, different leaf shapes and exciting textures to the spectacle. Finally add a swath of your favorite late-blooming perennials and garnish with an enjoyable container or 2 to get a bright splash of color.

Le jardinet

Creating a Foliage Picture Frame

In the scene below the eye is naturally drawn to the wide sweep of golden black-eyed Susan, yet this scene’s great looks rely a lot more on great foliage than on these ephemeral flowers.

A mixture of evergreen and deciduous trees and shrubs creates a frame for these sunny daisies. Although two trees punctuate the boundary, notice how several of these grasses and shrubs are planted in massive classes to help balance the bulk of flowers.

Strategic placement of simple containers helps to carry the color scheme through the cabin’s porch, making a wonderful escape for people who care to linger and enjoy the autumn screen.

The principal color scheme is green and gold, with a few bold accessories in crimson, showing restraint while being enjoyable.

This combination will start to develop in late July as the flowers begin to bloom. Those plants which are deciduous or die back in winter will do so over a period of many months. Even when the last leaf has fallen, the evergreen blossoms, conifer and striking bark of the pine tree will add interest.

Here is how to get the appearance.

Le jardinet

1. Begin with the trees. Insert structure and height with a couple of trees. Both the golden locust tree and the paperbark maple used here offer you excellent fall foliage, so this late-season border will continue to become a garden display for many months.

The golden locust tree shines a foliage spotlight on the entire scene. The chartreuse leaves of summer and spring turn into a softer yellow in autumn — a beautiful counterpoint to the adjacent maple and a wonderful comparison to the cedar-shingled cabin.

Botanical name: Robinia pseudoacacia ‘Frisia’
Common title: Golden locust tree
Where it will grow: Hardy to -30 degrees Fahrenheit (USDA zones 4 to 9; locate your zone)
Water requirement: Low once established
moderate requirement: Full sun for best color
Mature size: 30 to 50 feet tall and around 20 feet wide
Seasonal interest: Spring to collapse
When to plant: Plant it into well-drained soil in spring or autumn.

Caution: Golden locust trees can produce unwanted suckers in some parts of the U.S.

Le jardinet

The paperbark maple is a modest-size, slow-growing deciduous shrub, prized not just for its beautiful foliage but also for its appealing paring cinnamon-colored bark.

Le jardinet

In autumn the leaves of the paperbark maple vary from green to shades of peach, coral and caramel — a wonderful highlight of any autumnal screen.

Le jardinet

Botanical name: Acer griseum
Common title: Paperbark maple
Where it will grow: Hardy to -30 degrees Fahrenheit (zones 4 to 8)
Water requirement: Low once established
moderate requirement: Full sun or partial shade
Mature size: 18 feet tall and around 15 feet wide
Seasonal interest: Year-round
When to plant: Plant it into well-drained soil in spring or autumn.

Le jardinet

2. Insert a lesser tier of shrubs. With the elevation established, it’s time to fill in the floor plane with an range of shrubs and low-growing conifers. Soft gold shades blend with blue-green to make a vibrant fall tapestry.

Feelin’ Blue deodar cedar is a standout in the garden with its low, wide-spreading habit and stunning blue tones. This evergreen conifer is totally low maintenance and deer resistant, and has also been drought tolerant in my backyard.

Botanical name: Cedrus deodara ‘Feein’ Blue’
Common title: Feelin’ Blue deodar cedar
Where it will grow: Hardy to 0 degrees Fahrenheit (zones 7 to 9)
Water requirement: Low once established
moderate requirement: Total sun
Mature size: 2 to 4 feet tall and around 6 feet wide. It can also be trained as a low standard to form a brief weeping shrub.
Seasonal curiosity: Year-round
When to plant: Plant it into well-drained soil in autumn or spring.

Le jardinet

Spirea come in many sizes and its foliage comes in many colors — it is really just a matter of choosing your own favorite. This layout features Double Play Big Bang spirea.

In spring the leaves opens in shades of orange and aluminum, turning a gentle green in summer and yellow in autumn. Apartment clusters of pink flowers attract butterflies in summer. And although deer do nibble the new shoots, I do not mind — it boosts a flush of new rosy growth, as shown here.

Le jardinet

This is unquestionably a shrub to put in your backyard for 3 seasons of interest.

Botanical name: Double Play Big Bang Spiraea ‘Tracy’
Common title: Double Play Big Bang spirea
Where it will grow: Hardy to-30degrees Fahrenheit (zones 4 to 9)
Water requirement: Low once established
Light requirement: Total sun
Mature size: 3 feet tall and wide
Seasonal interest: Spring through autumn
When to plant: Plant it into well-drained soil in spring or autumn.

Le jardinet

3. Use wispy textures to add softness. Bring a feeling of movement to your garden by including delicate grasses or other fine-textured foliage which will move in the breeze. They will produce a soft background for the stiffer shrubs and flowers.

Who can withstand bronze fennel? Not me! Just look at that foliage — and it looks even more amazing when the early-morning dew collects on its feathery branches. Yes, it does self-seed, so perhaps this isn’t for everyone — and really, this autumn combo would still look lovely without it but you need to acknowledge the feathery foliage is spectacular and certainly adds to this scene.

Botanical name: Foeniculum vulgare ‘Purpureum’
Common title: Bronze fennel
Where it will grow: Hardy to -30 degrees Fahrenheit (zones 4 to 9). In zone 3 it could be appreciated as an annual without anxiety of these seeds’ overwintering
Water requirement: Low
moderate requirement: Total sun
Mature size: 6 feet tall and wide
Seasonal interest: Spring through autumn
When to plant: Plant it into well-drained soil in spring.

Caution: Bronze fennel can self-seed and become a nuisance.

Le jardinet

Grasses are the typical choice for adding excellent texture to the backyard, and the evergreen Mexican feather grass is one of my personal favorites, as it is not invasive where I live. You may prefer to substitute orange hair sedge (Carex testacea, zones 7 to 10), which is also evergreen and would stay within the color scheme.

Botanical name: Stipa tenuissima
Common title: Mexican feather grass
Where it will grow: Hardy to -10degrees Fahrenheit (zones 6 to 10); avoid planting where it’s invasive.
Water requirement: Low
moderate requirement: Total sun
Mature size: 18 to 36 inches tall and wide
Seasonal interest: Year-round
When to plant: Plant it into well-drained soil in spring.

Le jardinet

4. Add bold sweeps of your favourite autumn flowers. Black-eyed Susans are with no doubt a drop favorite. Place them within a picture frame of beautiful foliage, and they’ll really shine.

Botanical name: Rudbeckia ‘Goldsturm’
Common title: Black-eyed Susan
Where it will grow: Hardy to -10 degrees Fahrenheit (zones 6 to 10)
Water requirement: Reduced to moderate
Light requirement: Full sun or partial shade
Mature size: 3 feet tall and wide
Seasonal interest: Summer through fall
When to plant: Plant it into well-drained soil in spring or autumn.

Le jardinet

Zagreb tickseed is a remarkably low-maintenance perennial which produces dozens of 1-inch-diameter yellow daisies within a period of many months without deadheading. In the first picture you can see they’ve been used to flank the pathway resulting in the cabin.

Botanical name: Coreopsis verticillata ‘Zagreb’
Common title: Zagreb tickseed
Where it will grow: Hardy to -40 degrees Fahrenheit (zones 3 to 9)
Water requirement: Low
Light requirement: Total sun
Mature size: two feet tall and wide
Seasonal interest: Spring through autumn
When to plant: Plant it into well-drained soil in spring or autumn.

Le jardinet

5. Accessorize. Insert detail and an excess layer of color by incorporating a drop container garden in your vignette. This container sits on the cabin porch, and while the mix keeps within the general warm color scheme of this garden planting mix, it moves past the golden yellows to fiery orange and red.

Caution: Some of the plants listed in this ideabook may be invasive in your area. Check with your neighborhood cooperative extension or county extension office prior to planting any.

See related

Southwest Gardener's September Checklist

Summer’s almost over and temperatures have started to cool, so it’s time for desert gardeners to venture outside and dress their own landscape with new trees, shrubs and succulents. Vegetables and fruits growing in upper-elevation gardens are ready to be harvested, and bulbs may be planted now for a gorgeous spring display.

Noelle Johnson Landscape Consulting

Low Deserts (around 3,000 Trainers)

Add feel with distinctively shaped succulents. The spiky traces of agave contrast beautifully with the rounded shapes of shrubs here, including a distinctive layout twist to the landscape.

Plant a couple of big agave, such as octopus agave (Agave vilmoriniana), smooth leaf agave (Agave desmettiana)or Weber’s agave (Agave weberi). Add three to five flowering ground covers around the base of each agave, such as purple trailing lantana (Lantana montevidensis), verbena (Glandularia spp), blackfoot daisy (Melampodium leucanthum)or prostrate rosemary(Rosmarinus officials ‘Prostratus’).

Shown: Weber’s agave with gopher plant (Euphorbia biglandulosa)

Noelle Johnson Landscape Consulting

Fertilize palm trees. Palms should be fertilized throughout the hot months of summer, since they can uptake fertilizer only when the soil is warm. Use a fertilizer specially formulated for palm trees, which will include the significant nutrients and micronutrients that palms need to be healthful. Follow the directions on the fertilizer package water and carefully deeply after applying. When in doubt about how much to use, it is best to apply a little less fertilizer rather than a lot of, which may burn your crops.

Find the Ideal palm to your lawn

Shown: Mediterranean fan palm (Chamaerops humilis)

Noelle Johnson Landscape Consulting

Prepare your vegetable garden before planting cool-season edibles. Add a 3-inch layer of compostor manure to existing vegetable garden dirt and lightly rake it in.

Toward the end of September, plant broccoli and cauliflower from seed or transplants.

Shown: Broccoli

Noelle Johnson Landscape Consulting

Give citrus trees their last application of fertilizer to the year. Citrus trees have to be fertilized three times each year: in late winter, early summer and late summer. Apply citrus fertilizer around the base of this tree, after the package instructions. Be sure to add fertilizer out to the drip line, which is really where the majority of the origins of citrus trees are situated.

For the best results, water before and after applying fertilizer to allow it to attain the roots.

Shown: Kumquats

Noelle Johnson Landscape Consulting

Mid- to High Deserts (3,000 to 6,000 Trainers)

Spice a boring garden with ornamental grasses. There’s a great reason why these grasses are known as cosmetic. They add beauty to the landscape with their gently mounded shapes.

Plumes of varying colours of burgundy to tan look in autumn, based on the species. Plant ornamental grasses in groups of five or three; try gulf muhly(Muhlenbergia capillaris ‘Regal Mist’), deer grass (Muhlenbergia rigens)or Mexican feather grass (Stipa tenuissima)for a gorgeous autumn display.

8 Spectacular Grasses to Energize a Fall Garden

Shown: Regal Mist pink muhly (Muhlenbergia capillaris ‘Regal Mist’)

Noelle Johnson Landscape Consulting

Year-old perennials by breaking them. If your elderly perennials are not flowering just like they used to, it is probably time for them to be divided (that is, dividing the root system of a large plant into at least two sections that may then be replanted). Perennials such as daylily, Shasta daisies, coneflower and iris do best when divided every 3 decades.

You can use a scoop to separate plants to smaller portions and then replant them in your backyard or give some to friends.

Shown: Shasta daisy (Leucanthemum x superbum)

Noelle Johnson Landscape Consulting

Change outside warm-season annuals for cool-season blossoms. With the approach of fall, it is time to switch out of summer-flowering annuals to people that will thrive in Southwestern winters. Before planting new flowers, amend the soil with compost and a slow-release fertilizer.

Create lovely colour combinations in your favorite container by incorporating three distinct flowering plants. Try planting yellow snapdragons at the center, then add deep purple petunias and finish off with white alyssum round the exterior. Or use bright pink geraniums surrounded by white petunias and gloomy lobelias.

Shown: Snapdragons

Noelle Johnson Landscape Consulting

Fertilize your warm-season lawn. Even though summer lawns will shortly go dormant, now’s the very best time of year to fertilize. Fall fertilizing adds vital nutrients which will strengthen the roots and will help the grass to green up earlier in spring.

See more autumn lawn maintenance

Noelle Johnson Landscape Consulting

Plant leaf lettuce. Leaf lettuce is very easy to grow from seed or transplants. Anyone who has tasted new homegrown lettuce understands that the flavor of store-bought lettuce simply can not compare to it.

Shown: Leaf lettuce

Noelle Johnson Landscape Consulting

Upper Elevations (More than 6,000 Trainers)

Harvest tomatoes before the first frost. September generally attracts the first frost, so head out in the backyard and pick each one your tomatoes — green ones and all. Don’t worry if you’ve got a bunch of green tomatoes; they will ripen indoors.

Noelle Johnson Landscape Consulting

Plant spring-blooming bulbs now to ensure a gorgeous show. The blossoms from spring bulbs would be the much-looked-for harbingers of spring. But to appreciate them, you need to plant bulbs now, so they are going to grow roots before the ground freezes.

For maximum color effect, plant crocus, daffodil, hyacinth or tulip bulbs in massive swaths rather than in a single row.

Shown: Blue hyacinth

Noelle Johnson Landscape Consulting

Grow your garlic. Plant garlic now for a yummy harvest next summer. Garlic is very easy to grow. Only plant person tsp 2 inches deep in your vegetable garden or in a container. Plant each clove with the pointed end up, 6 inches away from each other in rows which are just 1 foot apart.

Noelle Johnson Landscape Consulting

Preserve the flavors of your summer garden by drying herbs. Herbs can readily be dried by tying them in bunches and hanging them in a dry, dark location. Drying takes. When the herbs are dry, then crumble the dried leaves into small pieces, keep them in sealed jars and use them to flavor your favourite dishes.

Prepare for October. Plants need less water as the temperatures cool, so adjust your irrigation control as needed.

See related

Set Your Shade Garden Aglow With Light

Light and life are inextricably related. From its beginning, the human race has worshipped, celebrated and sought to catch light. And I feel that gardeners, over most people, are aware of lighting: how it affects our plants and the way it influences our moods. Phototropism (how plants grow toward sunlight ) and seasonal affective disorder are just two examples of its effects.

People appear to desire what they apparently can’t have. People with straight hair want curly hair. People that have curly hair want straight hair. Shade gardeners want more sun. Sun anglers desire more colour. My personal garden resides in partial to full shade. Through the years I have celebrated it, cursed it, embraced it and tweaked it. My garden has gone through this procedure with me, indulging me, being patient with me and sometimes fighting back at me. Finally, my garden is all the better for it, as am I. We’re at peace.

Let me take you on my journey. If your garden is a color garden, I think that I can help save you time, money and frustration. Let’s take a stroll and have that dialogue.

Jay Sifford Garden Design

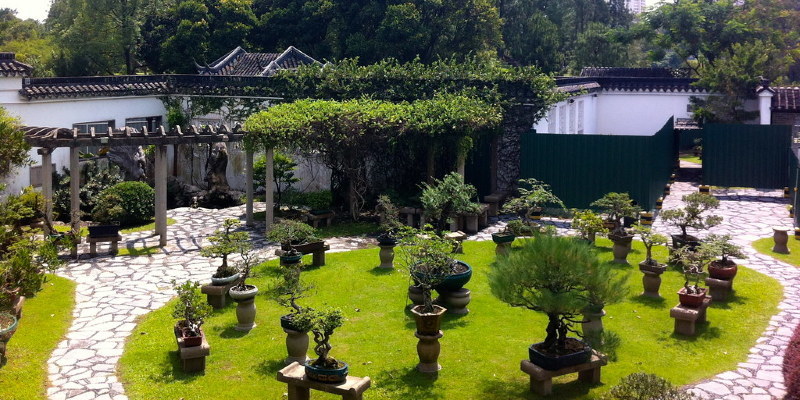
Take inventory of the way that light plays in your own garden. Since most gardeners realize, a truly great personalized garden takes some time to develop. This type of garden is no one-weekend DIY project, regardless of what television commercials preach to us. A fantastic gardener is one who has developed a keen sense of observation. An experienced gardener knows that sunlight strikes her or his garden differently at various times of year, the intensity of the sun ebbs and flows with the seasons, and that the color of sun varies with its own intensity.

Whether you are in the process of initially developing your colour garden or at the continuous process of renovating and editing, take a year to really notice how light interacts with your garden. Take photographs or maintain a journal to document your findings. Your garden is going to be better for it.

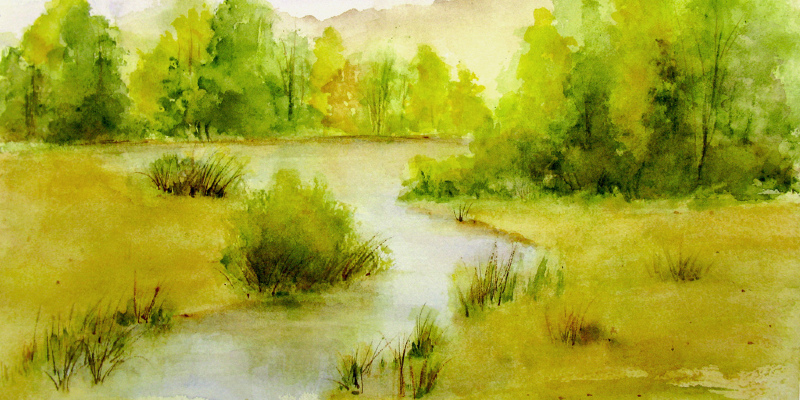
On the edge of my pond, beside the largest waterfall, is a flat boulder I affectionately call my”wine stone .” I sit in the evenings with coffee or in the day with a fantastic malbec, watch the koi and reflect in your life.

I shot this movie one day in late spring, when the morning sun appeared through the trees and flawlessly choreographed the interactive dance between the hardy begonia (Begonia grandis, zones 6 to 9) and also the fall fern (Dryopteris erythrosora, zones 5 to 9). This only happens for a few minutes daily, but what a spectacular way to begin the day. I wouldn’t miss it.

Ron Yeo, FAIA Architect

Consider pruning, limbing up or elimination to open up your distance. Your garden space will talk to you if you open your mind and soul and just listen. My approach to garden design incorporates a bit of mysticism, as I feel that a distance will enable you to know what it yearns to become. A successfully implemented garden is a cooperation between what the space says and the way the gardener interprets this speech. This skill comes naturally to some people but is a learned skill to most. If you are having trouble in this area, don’t hesitate to request the help of a fantastic garden designer or landscape architect with whose work you are familiar.

Once you have a vision to the shape and scope your garden needs to take, you might find it necessary to prune, thin saplings or limb your trees up to create an environment that welcomes sun. You might also need to hire a fantastic arborist to remove trees that are detracting from the overall feel of your garden or inhibiting your sight lines. This occasionally requires fortitude, but your garden will thank you in the long run.

Chicago Specialty Gardens, Inc..

Embrace the art of backlighting. Some of the mundane plants in your garden will suddenly take on fresh vibrancy when placed in front of available light.

Some of the best plants for this technique are the ones that are translucent by nature, the ones that catch and diffuse light.

My favorite translucent plant is the sometimes-invasive horsetail rush (Equisetum hyemale, zones 3 to 11). Its 3- to 4-foot vertical growth habit is an ideal foil for a curved or rounded sculpture, or a clumping shrub. Just make sure you contain it, lest it spread indefinitely.

Jay Sifford Garden Design

Aside from backlighting an individual plant, you can backlight an whole garden scene. This photo shows a magic late-afternoon garden second. Who wouldn’t wish to return home to this after sitting at rush-hour traffic?

Harold Leidner Landscape Architects

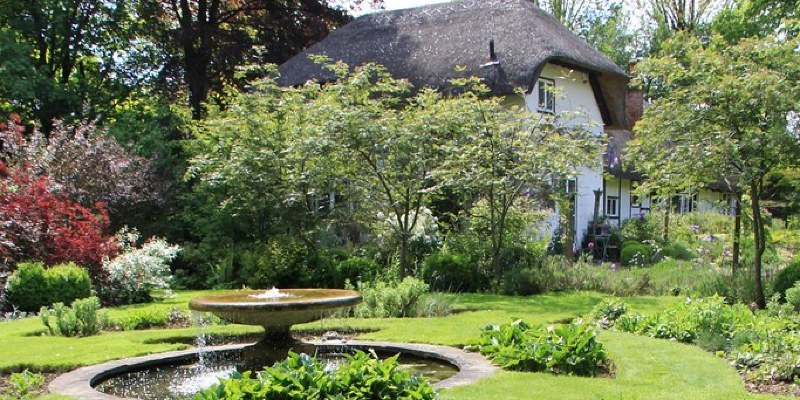
Catch reflections on water. Water features are excellent instruments to use in our quest for inviting light into our garden spaces. Water churns, bubbles, spills and cascades, all the while catching light in ever-changing ways. A correctly sited and designed water feature may be a mesmerizing focal point.

I wholeheartedly suggest that you consult a pond specialist, and that you view her or his work in different gardens, before you design and set up your own pond. A badly constructed water feature will probably be an expensive disappointment.

Locate pond designers on

Jay Sifford Garden Design

Watch ice light the winter garden. Most of us think ponds to be warm-weather features that are coated, drained or place to bed for winter. Your pond may reinvent itself in winter, performing double duty as a cold-weather garden focal point. Consider the captivating elegance of ice because it forms at a pond. Notice the way its opaque beauty captures the winter light better than any artist could.

Jay Sifford Garden Design

Insert glass. Nothing catches, reflects and refracts light such as glass. The pieces shown here have been custom designed to mimic fresh shoots of plant growth and placed so that they rise out of a sea of shade-loving ground cover.

One thing to consider before installing a glass sculpture in your garden is potential breakage from overhead limbs falling in inclement weather. Assess your financial plan and tolerance amount for reduction before purchasing your glass. If you decide to put money into a glass garden sculpture, then you’ll get shining rewards.

Jay Sifford Garden Design

Let light project onto a screen. Much like the drive-in film theaters of the past, you are able to project light in your garden, capturing its movement and nuances, by erecting a wall or screen, or perhaps by enlisting the side of your residence. This three-paneled privacy screen, built from concrete backer board like you’d find beneath a tile flooring, faces west and jobs a virtual documentary of the day sun. Who wouldn’t wish to watch this light display?

Margie Grace – Grace Design Associates

Create the illusion of light with chartreuse foliage. The human eye generally reads sun as having a yellow cast. You can present the illusion of light into a color garden by introducing plants using chartreuse foliage. This photograph illustrates the principle brilliantly. Do not you almost wish to squint when you view this photo? On a closer look, you understand this really is a shaded area, the impact of sun is an illusion.

Pulling off this illusion does require some skill, but here are some tips to get you started.
Begin by observing the way that shafts of sunlight pierce the tree canopy in your garden and the consequent shape on your garden floor. Is it an elongated triangle, a line or a patch? Leave your plants in their pots and arrange them in this pattern until the outcome is gratifying to you. Easier still, wait till the sun creates its distinctive shape on your garden flooring, then trace the pattern with your potted plants.
Among my favorite chartreuse-leafed plants for you to consider, taking into consideration your specific growing requirements:
‘Sun Power’ and ‘Sum and Substance’ hostas (Hosta cvs, zones 4 to 9)‘All Gold’ and‘Aureola’ Japanese forest grass (Hakonechloa macra cvs, zones 4 to 9)‘Orange Fantasy’ Japanese walnut (Acer palmatum‘Orange Fantasy’, zones 5 to 9)Golden sweet flag (Acorus gramineus‘Ogon’, zone 5 to 9)Scotch moss (Sagina subulata‘Aurea’, zones 3 to 9) ‘Skylands’ Oriental spruce (Picea orientalis‘Skylands’, zones 4 to 8)
Note that plants with chartreuse foliage require at least a few hours of sun to carry out correctly.

Katia Goffin Gardens

Insert plants with white flowers or foliage foliage. Nothing brightens a color garden such as white flowers and foliage. While white doesn’t imitate sun quite as well as chartreuse, it’s still quite effective in providing the illusion of lighting. It’s also especially effective at dusk, when it appears to glow.

What’s a color garden without a minumum of one hydrangea? Before buying your hydrangea, do some quick research on the types best suited to your location.

The oakleafs and mopheads are much better suited to colour, whereas the paniculatas require sun to achieve their thriving possible. ‘Little Honey’ (Hydrangea quercifolia‘Little Honey’, zones 5 to 9) combines the best features for our discussion since it may take colour or partial sun, also has chartruese foliage and white flowers. Another one of my favorites is ‘Incrediball’ (Hydrangea arborescens ‘Abetwo’, zones 3 to 9). Its nondrooping 12-inch flower heads are real showstoppers.

Some plants with variegated foliage that you consider are bugloss (Brunnera macrophylla, zones 3 to 2 ),’Patriot’ hosta (Hosta‘Patriot’, zones 3 to 2 ),’River Mist’ Northern sea oats (Chasmanthium latifolium‘River Mist’, zones 4 to 9), also’Floating Clouds’ redbud (Cercis canadensis‘Floating Clouds’, zones 5 to 9).

Possidento Lightscapes LLC

Invest in garden light. Nothing animates a garden quite like good-quality lighting. This spectacular photo says everything. There are a number of points to consider before light setup. Do your research concerning technology, yearly utility cost, and fixture and bulb life.

LED light has come a long way in just the last couple of years and is extremely economical as time passes. Buy the best-quality light you are able. Cheaper lighting is going to wind up costing you more in the long term, in terms of both replacements and electricity usage.

Most significant, decide which focal points should be illuminated and which ones are better left to daylight. There is a fine line between just enough light and also much. Consider the enchanting elegance of shadows and shadow to gain the most from light your garden.

I have seen way too many DIY lighting jobs that wind up looking like the vegas strip. If you are not gifted with an eye for design, please consider having your system designed and installed by a certified professional with whose work you are familiar.

More:
Discover outdoor lighting experts on
The 3 Best Ways To Light Up Your Landscape

See related

Summer Plants: How to Boost Tomatillos

Tomatillos, also referred to as husk tomatoes, are a vital ingredient for several Mexican dishes, such as salsa verde and enchiladas verde. They’re also yummy whether eaten raw or cooked, so why not add them to your edible garden? They have the identical basic care requirements because their tomato cousins, with the added advantage of fewer issues and a longer and frequently sooner crop, a plus in short-summer places. Additionally they reseed.

The crops resemble berries but using papery husks encasing the fruits. Green tomatillos are the most common, but it is possible to find some that are purple or yellow. Purple varieties are generally sweeter. For odd varieties check Johnny’s Selected Seeds, Seeds of Change and Seed Savers Exchange.

Notice: To put fruit, you’ll need at least two crops for cross-pollination.

When to plant: Start seeds inside five to eight weeks prior to your planned planting date; set out begins or nursery plants two weeks to a month after your last frost and after the soil is warm.

Days to maturity: 70 to 120

Light requirement: Full sun

Water necessity: Regular

Favorites: Cisneros, Fiesta Duo, Green Husk, Pineapple, Purple, Purple di Milpa, Toma Verde, Verde Pueblo, Zuni

Photo courtesy of Seed Savers Exchange

The New York Botanical Garden

Planting and care: Wait until the frost has passed and the soil has warmed up before planting outside. Pick a website with rich, well-drained soil in full sun. Work in compost plus a low-nitrogen fertilizer prior to planting.

Plant deeply, burying about two-thirds of this plant. Leave 1 1/2 to two feet between plants. Tomatillos fared well in containers. Even a 12- to 15-gallon size is good, even though they will grow bigger baskets.

Water thoroughly after planting. Add supports now also, whether conventional tomato cages, stakes or some other sturdy structure. Nonmetal stakes or cages will not burn the plant if they become hot. As the crops grow, reaching an eventual height of 3 to 4 feet, attach the stems to the supports with tender ties.

Water regularly, about 1 to 2 inches directed to the base of this plant. Keep the roots moist but not soggy Mulching helps conserve water and keep weeds down. To promote fruit set, feed the soil using a low-nitrogen fertilizer after flowers look.

Tomatillos aren’t bothered by several pests and diseases. Providing good air circulation around the plants will help stop early blight, and staking will frustrate snails and slugs. Other issues you may experience are aphids, beetles, leaf-damage pests and powdery mildew.

Harvest: select the fruit when it’s filled the husk but remains firm to touch, and the husk has become brown and began to split. Remove the husk and wash off the fruit just prior to use.

See related

8 Pickable Plants for Fall Centerpieces

An alteration in the season often inspires a change in house decor. Bring a bit of your fall garden inside to change things up. Here are some fall floral favorites which make charming autumnal structures and centerpieces.

Amoroso Design

With their big, multiflowered clusters, hydrangeas make excellent cut flowers. The simple fact that they are available in a wide variety of sizes and colors makes them suitable for virtually every landscape. Not just gorgeous at first blush, many turn into an attractive red purple for fall beauty as well. These two varieties are great for cutting:

Smooth Hydrangea
Botanical name: Hydrangea arborescens
USDA zones: 3 to 9 (find your zone)
Water requirement: Medium moisture, well-drained soil
Light condition: Partial shade
Mature size: 3 to 4 ft tall and broad

Oakleaf Hydrangea
Botanical name: Hydrangea quercifolia
USDA zones: 5 to 9
Water requirement:Medium moisture, well-drained soil
Light condition: Full sun to partial shade
Mature size: 6 to 10 feet tall and broad

With the help of a male pollinator, the feminine winterberry ‘Afterglow’ grows abundant orange-red fruit. These berries will persist through winter and provide food for birds. A simple spray of orange winterberry onto a table instantly evokes a sense of fall.

Botanical name: Ilex verticillata ‘Afterglow’
USDA zones: 3 to 9
Water requirement:moderate to moist soil
Light requirement: Full sun to light shade
Mature size: 3 to 6 ft tall and wide

Amy Renea

The bright yellow, fluffy plumes of goldenrod or Soldiago bring exceptional fall color to the landscape as well regarding the dining table. The ease of this table arrangement magnifies its effect.

A native into the U.S., Solidago has been wrongly accused of causing hay fever, which is actually brought on by wind-born pollen from plants with a similar bloom time, such as ragweed.

Botanical name: Solidago speciosa
USDA zones: 3 to 8
Water requirement: Dry to moderate moisture, well-drained soil
Light condition: Entire sun
Mature size: 2-3 feet tall and broad

Debra Campbell Design

Native to dry plains, prairies and meadows in the U.S., late-blooming sunflowers attract cheerfulness to some table arrangement. Easily grown from seed, they are available in a vast selection of sizes and colors for cutting, intended.

Botanical name: Helianthus annuus
USDA zones: N/A; yearly
Water requirement: Dry to moderate moisture, well-drained soil
Light condition: Entire sun
Mature size: 3 to 10 feet tall and 1 1/2 to 3 ft broad

The Holy lotus isn’t just famous for its big, spectacular flowers; its own seed pods are precious additions to drop floral structures when dried. Since this plant could be grown submerged, it creates a terrific addition to pond and water gardens. But it is best to maintain submerged groups of it in containers for manageability.

Botanical name: Nelumbo nucifera
USDA zones: 4 to 10
Water requirement: Wet, boggy soil
Light condition: Total sun
Mature size: 3 to 6 ft tall and 3 to 4 ft wide

Kim Gamel

A vase of tree branches with fall foliage creates a fall arrangement that is very simple. While maples are thought to be go-to trees for fall color, another tree worthy of consideration is the ginkgo, or Maidenhair tree. The unique fan-shape leaves turn a brilliant yellow in fall — ideal for a tabletop display.

Botanical name: Ginkgo biloba
USDA zones: 3 to 2
Water requirement: Medium moisture, well-drained soil
Light requirement: Total sun
Mature size: 50 to 80 feet tall and 30 to 40 feet broad

Debora carl landscape design

Known by many psuedonyms, curly willow hasbranches that include a rustic yet whimsical feel to structures. Whether mixed with flowers or on their own, these architectural branches make a statement.

Botanical name: Salix matsudana ‘Tortuosa’
USDA zones: 5 to 8
Water requirement: Medium to moist dirt
Light requirement: Full sun to partial shade
Mature size: 20 to 30 feet tall and 10 to 15 feet wide

Missouri Botanical Garden

An extremely unique-looking “fruit” to consider for your fall table is Osage orange. A native to Texas, Arkansas, Oklahoma and Louisiana, this thorny tree contains inedible grapefruit-size, wrinkly fruits which ripen to a bright chartreuse. Put in a bowl on your table and call it a day.

Botanical name: Maclura pomifera
USDA zones: 4 to 9
Water requirement: Dry to moderate vulnerability, well-drained soil
Light condition: Entire sun
Mature size: 35 to 60 feet tall and broad

Tell us What are some of your favorite fall plants to bring inside?

See related

Fantastic Design Plant: 'Little Henry' Sweetspire

There’s no room in my backyard for prima donnas. Everything has to perform well without fussing or particular fertilizer, deal with herds of deer and thick clay dirt, and look great in the procedure. ‘Little Henry’ sweetspire is a unassuming deciduous shrub that quickly earned a place as one of my favorites.

U. of Maryland Arboretum & Botanical Garden

Botanical name: Itea virginica ‘Little Henry’
Common title: ‘Little Henry’ sweetspire
USDA zones: 5 to 9 (find your zone)
Water requirement: Typical to moist
Light requirement: Full sun or partial shade
Mature dimension: 2-3 feet tall and wide
Benefits and tolerances: Attracts butterflies but not deer; tolerates wet soil, although once established it will deal with drier conditions
Seasonal interest: Spring, summer, fall
When to plant: Anytime

U. of Maryland Arboretum & Botanical Garden

Distinguishing traits. If you’re searching for an easy-care tree using a five-star rating, this is it.
Figurines: Masses of pendulous racemes of lightly fragrant white flowers cover this shrub in spring. Foliage: Healthy medium green leaves turn up the heat in fall using a fiery display to equal the omnipresent burning bush (Euonymus alatus, zones 4 to 9). Form: A neat, weed-smothering moundSize: Contrary to its big brother ‘Henry’s Garnet’, ‘Little Henry’ is only 2 to 3 feet tall and wide — perfect for smaller households. Soil: Joyful with wet feet. Clay soil? No issue.

U. of Maryland Arboretum & Botanical Garden

How to use it. I’ve this shrub massed along a stream bank, where the clay land and saturated winter states are a bonus as opposed to a problem.

The modest size of ‘Little Henry’ makes it convenient for the front of the border or perhaps lining a woodland walk, where it combines beautifully with ferns and Japanese maples.

Personal Garden Coach

To me personally the fall color is its best feature, so be sure to plant this where you can enjoy it at that time of year. Complete sunlight brings out the very intense fall color; mix it with other sun-loving shrubs and grasses to draw focus to this attribute.

This picture shows how the rosy tints of ‘My Monet’ weigela (Weigela florida‘My Monet’, zones 4 to 6) make an attractive color echo, whereas ‘Blue Dune’ lyme grass (Elymus arenarius ‘Blue Dune’, zones 4 to 9) cools things down in an exciting screen.

Personal Garden Coach

Planting notes. Think in multiples. 1 shrub is pretty, but a bulk of five or even more is magnificent.

No particular treatment is required when planting. Just tease out the roots and water in well. Some gardeners prefer to add fertilizer to backyard shrubs in spring, but I prefer to just use compost as a yearly increase to improve general health and vigor whilst also helping to keep soil moisture.

It’s improbable that pruning will be essential, but it can be done immediately after flowering if needed.

See related

Southeast Gardener's August Checklist

August air is thick. Walking through the garden in the morning is like stepping into a sauna. While dawn is the coolest part of the day, it is still sultry. August gardening in the Southeast is not for the faint at heart. Some even give up and pray that September comes premature.

Effectively, gardening during August requires a program change, if you don’t relish punishment. I happen to tolerate an August garden since the wildlife keeps me interested, but admittedly, the anticipation of this meteorological fall, which often occurs towards the end of the month, is among my favourite times in the gardening season. I press in August and enjoy the South in all its glory that is psychedelic.

Gardening with Confidence®

Harvest vegetable gardens as necessary. Most of what you have growing in your own vegetable garden are annuals. By August, they’re searching a little wrung out. As plants finish their production cycle, remove them in the garden; otherwise, they may attract insects and disease to the crops that are still productive.

Gardening with Confidence®

Deadhead flowers. Keep your flowers flowering longer by removing faded blossoms from the cannas, roses, daisies and more.

Gardening with Confidence®

Fertilizer dos and performn’ts. As August arrives, some crops will benefit from a program of fertilizer. For other crops, it might do more damage than good.

Do fertilize:
Summer fruits like tomatoes, peppers and eggplant continue to produce when fertilized regularly. Use a product that contains 5% nitrogen.Fall vegetable cropsFall-blooming perennial and annual flowersChrysanthemums and dahliasCannasReblooming iris would gain from a mild applicationWarm season lawns (Bermuda and Zoysia) can be fertilizedRemember to water any use of fertilizer well into the soil to supply nutrients for the roots of the plants.

Don’t fertilize:
Azaleas and camellias, since the compost will disturb bud formation.Summer-flowering shrubs shouldn’t require pruning for exactly the exact same reason.

Gardening with Confidence®

Water your container crops well. From hanging baskets to veggies to the deck, the majority of us possess some sort of container planting. August can be hot, so be sure to keep your container plantings well hydrated.

Gardening with Confidence®

Propagate roses. Roses could be propagated by layering as late as mid-August. Long, flexible canes are the easiest to propagate since they’re easiest to bend into place. Use a clean knife to remove two thorns near the top of the stem and then bend it toward the ground. Make a couple of small cuts into the bark involving in which the thorns were. This is called “wounding the cane.” Hold the wounded region in touch with the dirt with landscape pins and cover with dirt, leaving the growing tip of the stem discovered. It’s also a fantastic idea to put a brick or stone over the covered and wounded cane to give it extra grip.

Next spring, you should see new growth emerge. Once you see new leaves around the rooted stem, carefully remove the entire stem from the parent plant, and recut the stem just under the new root mass. Now you are ready to plant your new rose bush.

Gardening with Confidence®

Pests. See these in your own pines? They’re the Pine Sawfly larvae. Pick them off and drop them in a bucket of soapy water.

Gardening with Confidence®

Bulbs. Select and preorder your own spring-blooming bulbs now while supplies are plentiful. Don’t put off today what’ll be gone tomorrow. The peculiar bulbs sell out. I can say this now since I have already put in my order. Try something interesting like the species tulip Tulipa clusiana.

Gardening with Confidence®

Cut blossoms. Recall those zinnias you seeded in July? Seed more in August, and be sure to cut some to appreciate indoors!

More:
Guides to gardening in the Southeast

See related

Rocky Mountain Gardener: Things to Do in June

June reigns as queen at the garden world. Even at higher elevations, winter has loosened its arctic grip, along with the lush greens of new foliage shimmer in the sun’s warmth. Insert the jewellike glow of abundant blossoms and June is, indeed, a month to behold. This can be a busy time in the garden, with plenty of options to keep you active and involved until the heat of summer arrives. The important thing is setting your objectives and prioritizing your time so that you don’t run yourself ragged. Summertime should be enjoyable time, right?

Jocelyn H. Chilvers

Jocelyn H. Chilvers

Plant edibles. Growing delicious foods and seasonings to your table is just one of the most rewarding aspects of gardening. If one of your goals this month is to get on the grow-your-own bandwagon, then make sure you prioritize your planting schedule to accommodate your time-sensitive requirements of your favourite plants; many rely on a particular number of days from planting until they’re mature enough to harvest.

Jocelyn H. Chilvers

Placing out small plants rather than starting from seeds is a fantastic means to jumpstart the process. After the final frost date has passed and the soil has warmed, you may safely plant warm-season crops, like cucumbers, summer squash, pumpkins, beans, peppers, eggplant, corn and tomatoes. Keep a lightweight freeze blanket useful and protect plants when nighttime temperatures are forecast to dip under 55 degrees.

Jocelyn H. Chilvers

Mix it up. Herbs and veggies incorporate nicely with decorative plants in mixed borders. Artichoke, Swiss chard, Tuscan kale, curl-leaf parsley, culinary sage, red cabbage and dill are just a couple of instances of summer hardy edibles with lovely texture and color.

Jocelyn H. Chilvers

Plant them into well-amended soil in areas that receive regular watering — I tuck mine to small spaces that border the edge of the yard, where they are easy to track and harvest.
Check with your county extension service for up-to-date info and plant recommendations for your particular site.

Jocelyn H. Chilvers

Plant annuals and perennials. Flowers offer much to entertain: color, form, texture and odor. As a food source they attract butterflies, birds and myriad other winged creatures. If your target is to bring some flower power to your backyard, then this really is the ideal time to see the regional garden centre for the best selection. Container gardens can be a terrific way to bring the beauty of crops to the place where they are most needed. Consider including a cluster of colorful pots to a place that’s hard to garden , like an area with shallow, rocky land or dense tree roots.

Jocelyn H. Chilvers

Plant trees and shrubs. Shrubs and trees would be the permanent characteristics in your landscape, the crops which create rooms and mitigate harsh environmental factors like wind and sunlight. They add color and texture to the garden even during the long months of winter.

Jocelyn H. Chilvers

If your target is to bring some structure to your backyard, then June is the ideal time to purchase woody crops, particularly broadleaf evergreens. Early summer planting gives them a fantastic start on creating new root growth and getting established prior to winter. Oregon grape holly (Mahonia aquifolium), Chidftan manzanita (Arctostaphylos x coloradensis‘Chieftan’), Bright Edge yucca (Yucca flaccida‘Bright Edge’) and Coral Beauty cotoneaster (Cotoneaster dammeri‘Coral Beauty’) are ranked for elevations up to 7,500 feet.

Jocelyn H. Chilvers

Shop for success. The best range of garden plants is now available at the regional garden centre. Sometimes so many options can be overwhelming. Keep these factors in mind:
Match the growing conditions of your website — sun, soil type and water availability — to the cultural needs of this plant. For example, a plant which needs a moist, shady setting won’t survive in a hot, glowing”hell strip.” Match the size of your garden area to the ultimate size of this plant. Spacing plants appropriately enables the natural type of the plant grow to its entire potential. Select new plants which will make an aesthetic contribution to your backyard. Is your backyard lacking in bold foliage textures or needing a shot of crimson? Insert those attributes to your record.

Jocelyn H. Chilvers

Primp. Eliminate the spent blossoms from spring-blooming plants. Deadheading the plant won’t just make it look much better, but it will keep it from forming seed. Your plants’ power will be better spent on developing healthy foliage and root systems. Some crops may also form another pair of flower buds and bloom once more. Deadhead by snipping the blossom and a little bit of the stem off; create your cut just above a leaf node.

Jocelyn H. Chilvers

For perennials that bloom on stalks or scapes which come from a foliage mass in ground level, like lilies (Lilium spp.) Or bearded iris (Iris germanica), cut the stalks all the way down to the bottom of this plant. For those masses of blossoms on perennials like candytuft (Iberis sempervirens), purple stone cress (Aubrieta deltoides) and basket of golden (Aurinia saxatilis), it is best to shear the whole plant down by about half.

Mulch. In June, as the soil warms and your crops are growing, it is a fantastic time to make sure you have a 2- to 3-inch layer of mulch during your planting beds. Mulch will help conserve moisture, stabilize temperatures, decrease soil erosion, reduce soil compaction and protect against weed growth. Local organic substances like pine needles, pine bark, shredded cedar and aspen chips are best for this function. An inorganic mulch of river stone or crushed stone could be preferable in areas where high winds or forest fires are a threat.

Jocelyn H. Chilvers

Visit. June is currently the month for garden tours. There’s no better way to get inspired by great layout, find new furnishings or plants or just reinvigorate your love of gardening than simply by attending a garden tour.

Some tours focus on landscapes which have been masterfully designed and installed by landscape professionals; many others revel in the private creativity of dedicated amateurs.

Garden tours tend to be fund raising events together with the profits benefiting a community organization. Nationally, the Garden Conservancy sponsors open days during the summer at some of their possessions across the USA.

Happy gardening!

See related

Arbor Day Applause: Iconic Los Angeles Trees

The trees which line our roads and color our outdoor living spaces function as a subtle yet defining feature of our communities. As arborists and tree lovers everywhere celebrate the significant contributions of trees on this past Friday in April, I can’t help but focus my adoration on those native to my hometown of Los Angeles.

The trees of Los Angeles are seen in enough shows to have earned their own celebrities. The palm trees lining the streets of Beverly Hills are, perhaps, most famously associated with the Southland. Local colleagues compose poetic pieces concerning the flourishing of purple Jacaranda each calendar year, also Santa Monica has designated a Morton Bay Fig as a landmark. As much as I love this veritable arboretum of trees, those I find most lovely are our natives. It takes something special to help our indigenous fauna flourish in our difficult soils. All these lovelies have that X factor.

Las Pilitas Nursery

The rambling structure of the Coast Live Oak (Quercus agrifolia) defines the city of Pasadena. Its compact canopy can span more than 100 feet — a fantastic advantage in warmer climates. Its expansive duplex will be matched by the Coast Live Oak’s root structure. It is slow growing, and its delights will depend on your recognition that it requires lots of space.

Las Pilitas Nursery

Should you need a little color and quickly, California’s white oaks (Quercus lobata) really are a superb choice. They are among the shade trees. Their unique 1- to 2-inch-long, chestnut brown acorns tend to drop more than usual, making the tree a valuable habitat for birds and wildlife.

Las Pilitas Nursery

One of the rewards of a happy Coast Live Oak: the beautiful male catkins.

Las Pilitas Nursery

California’s state tree, the Giant Sequoia (Sequoiadendron giganteum), has very wide-spreading roots. They add a stately beauty to park spaces and massive estates.

Las Pilitas Nursery

The Knobcone pine (Pinus attenuata) can grow to 20 feet tall. It thrives at higher elevations, but it isn’t the hardiest of our trees. It likes fertile soil and regular water.

Las Pilitas Nursery

Incense cedar (Calocedrus decurrens) can reach 30 feet. Its aromatic and clean foliage adds a crispness to any landscape. It’s hardy and manages diverse soils and moisture levels. With its compact needles, it makes for an effective windbreak.

Las Pilitas Nursery

The California bay (Umbellularia californica) includes a fantastic fragrance. Native to California and Oregon, the bay will like more water compared to some of the other trees shown here.

Las Pilitas Nursery

If you like the California bay, as I do, but reside in an area without the 30 inches a year of rain it requires, planting in color where the roots will stay cool all year can help. It is going to also work well in a container, where you can offer the extra hydration it needs.

Las Pilitas Nursery

Should you need a tree suitable for a small backyard or perhaps a tight area, Western redbud (Cercis occidentalis) is best. Not only does this provide an wonderful array of colour transitions throughout the year, but its delicate stem construction is lovely when it is bare.

Las Pilitas Nursery

Obviously, the redbud’s lovely blossoms attract butterflies.

More blossoms that attract butterflies

Las Pilitas Nursery

Toyon (Heteromeles arbutifolia), otherwise known as Christmas berry, provides a splash of colour to landscapes too. It likes full sun and usually increases to 6 to 8 feet high, although it can reach 20 feet under the right conditions. It thrives in California’s tough sandy- and – clay-based soils and only requires 4 to 5 feet of space at its base. The colorful berries may be used to make an earthy, lemony tea.

Great design trees:
Bald Cypress | Chinese Witch Hazel | Dove Tree | Japanese Maple | Manzanita | Persian Ironwood | Smoke Tree | Texas Mountain Laurel | Tree Aloe

See related

Dry Riverbeds Solve Water Runoff

With spring here, you may be wondering how to control runoff from snow removal cost Dover or rain hitting lands. Sudden or mismanaged water is not just inconvenient; in certain areas it is really dangerous. In my native Los Angeles, too much water can cause slope destabilization, slides and ocean pollution as runoff overwhelms storm methods. These are nasty troubles, but one of the potential solutions is extremely beautiful!

Dry riverbeds are a visually striking way to participate and manage the water on a house, whether you expect flash flooding or just aspire to ensure that you command and direct the water that enters your site as quickly as possible.

Landscape Architects, Golden Associates

While dry riverbeds are all workhorse features, don’t underestimate their capability to make a positive visual impact. In arid landscapes, the mixture of river rock and other permeable materials like this contrasting, colorful gravel could be dramatic and aesthetically pleasing.

Celine Fisk

While it may or might not be true in this backyard, it is possible to track water to feed water features like this small fountain.

Cassy Aoyagi, FormLA Landscaping

While the sense of power and energy created by the dry riverbed above is enhanced by the contrast in colour between the river rock and surrounding stone, riverbeds surrounded by materials of more similar materials, like the decomposed granite still convey richness and energy.

Note: A rain string visible on the left of this photo allows water to permeate into the ground and feed back into the groundwater table. An infiltration pit could help move excess water off the house.

While infiltration is favored, dry riverbeds can also help extra water percolate onsite before efficiently leaving the house after it has saturated the soil.

Cassy Aoyagi, FormLA Landscaping

While generally associated with more xeriscaped seems, as desert gardens live or die in their ability to efficiently handle sudden and low water, dry riverbeds can match a vast array of aesthetics.

Field Outdoor Spaces

A dry riverbed will help stabilize a slope by providing a place for water to escape, also a significant factor in preventing slides. This specific river may also feed an infiltration pit.

Kikuchi + Kankel Design Group

Dry riverbeds will help route water away from the base of a structure. This is important, so many structures are made without a firm understanding of the natural water flow on a house.

River Valley Orchids

This riverbed appears to feed a biological pond, a gorgeous and effective way to store water onsite while permitting some water to percolate and infiltrate the groundwater table.

Dry riverbeds are just 1 strategy for managing and directing extra water. Watch for forthcoming more ideabooks on associated subjects and test out Erin Lang Norris’ post on rain chains.

More:
Easy-Care Landscaping With Rocks and Boulders
Great Design Plant: Slipper Plant
Steeply Beautiful Slope Retention

See related