Southwest Gardener's September Checklist

Summer’s almost over and temperatures have started to cool, so it’s time for desert gardeners to venture outside and dress their own landscape with new trees, shrubs and succulents. Vegetables and fruits growing in upper-elevation gardens are ready to be harvested, and bulbs may be planted now for a gorgeous spring display.

Noelle Johnson Landscape Consulting

Low Deserts (around 3,000 Trainers)

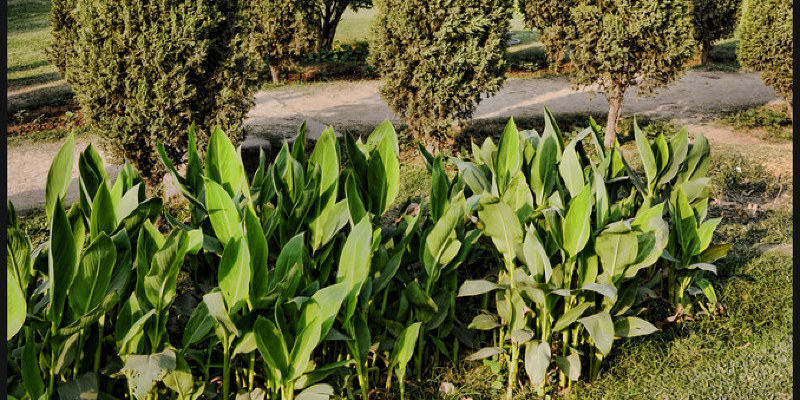
Add feel with distinctively shaped succulents. The spiky traces of agave contrast beautifully with the rounded shapes of shrubs here, including a distinctive layout twist to the landscape.

Plant a couple of big agave, such as octopus agave (Agave vilmoriniana), smooth leaf agave (Agave desmettiana)or Weber’s agave (Agave weberi). Add three to five flowering ground covers around the base of each agave, such as purple trailing lantana (Lantana montevidensis), verbena (Glandularia spp), blackfoot daisy (Melampodium leucanthum)or prostrate rosemary(Rosmarinus officials ‘Prostratus’).

Shown: Weber’s agave with gopher plant (Euphorbia biglandulosa)

Noelle Johnson Landscape Consulting

Fertilize palm trees. Palms should be fertilized throughout the hot months of summer, since they can uptake fertilizer only when the soil is warm. Use a fertilizer specially formulated for palm trees, which will include the significant nutrients and micronutrients that palms need to be healthful. Follow the directions on the fertilizer package water and carefully deeply after applying. When in doubt about how much to use, it is best to apply a little less fertilizer rather than a lot of, which may burn your crops.

Find the Ideal palm to your lawn

Shown: Mediterranean fan palm (Chamaerops humilis)

Noelle Johnson Landscape Consulting

Prepare your vegetable garden before planting cool-season edibles. Add a 3-inch layer of compostor manure to existing vegetable garden dirt and lightly rake it in.

Toward the end of September, plant broccoli and cauliflower from seed or transplants.

Shown: Broccoli

Noelle Johnson Landscape Consulting

Give citrus trees their last application of fertilizer to the year. Citrus trees have to be fertilized three times each year: in late winter, early summer and late summer. Apply citrus fertilizer around the base of this tree, after the package instructions. Be sure to add fertilizer out to the drip line, which is really where the majority of the origins of citrus trees are situated.

For the best results, water before and after applying fertilizer to allow it to attain the roots.

Shown: Kumquats

Noelle Johnson Landscape Consulting

Mid- to High Deserts (3,000 to 6,000 Trainers)

Spice a boring garden with ornamental grasses. There’s a great reason why these grasses are known as cosmetic. They add beauty to the landscape with their gently mounded shapes.

Plumes of varying colours of burgundy to tan look in autumn, based on the species. Plant ornamental grasses in groups of five or three; try gulf muhly(Muhlenbergia capillaris ‘Regal Mist’), deer grass (Muhlenbergia rigens)or Mexican feather grass (Stipa tenuissima)for a gorgeous autumn display.

8 Spectacular Grasses to Energize a Fall Garden

Shown: Regal Mist pink muhly (Muhlenbergia capillaris ‘Regal Mist’)

Noelle Johnson Landscape Consulting

Year-old perennials by breaking them. If your elderly perennials are not flowering just like they used to, it is probably time for them to be divided (that is, dividing the root system of a large plant into at least two sections that may then be replanted). Perennials such as daylily, Shasta daisies, coneflower and iris do best when divided every 3 decades.

You can use a scoop to separate plants to smaller portions and then replant them in your backyard or give some to friends.

Shown: Shasta daisy (Leucanthemum x superbum)

Noelle Johnson Landscape Consulting

Change outside warm-season annuals for cool-season blossoms. With the approach of fall, it is time to switch out of summer-flowering annuals to people that will thrive in Southwestern winters. Before planting new flowers, amend the soil with compost and a slow-release fertilizer.

Create lovely colour combinations in your favorite container by incorporating three distinct flowering plants. Try planting yellow snapdragons at the center, then add deep purple petunias and finish off with white alyssum round the exterior. Or use bright pink geraniums surrounded by white petunias and gloomy lobelias.

Shown: Snapdragons

Noelle Johnson Landscape Consulting

Fertilize your warm-season lawn. Even though summer lawns will shortly go dormant, now’s the very best time of year to fertilize. Fall fertilizing adds vital nutrients which will strengthen the roots and will help the grass to green up earlier in spring.

See more autumn lawn maintenance

Noelle Johnson Landscape Consulting

Plant leaf lettuce. Leaf lettuce is very easy to grow from seed or transplants. Anyone who has tasted new homegrown lettuce understands that the flavor of store-bought lettuce simply can not compare to it.

Shown: Leaf lettuce

Noelle Johnson Landscape Consulting

Upper Elevations (More than 6,000 Trainers)

Harvest tomatoes before the first frost. September generally attracts the first frost, so head out in the backyard and pick each one your tomatoes — green ones and all. Don’t worry if you’ve got a bunch of green tomatoes; they will ripen indoors.

Noelle Johnson Landscape Consulting

Plant spring-blooming bulbs now to ensure a gorgeous show. The blossoms from spring bulbs would be the much-looked-for harbingers of spring. But to appreciate them, you need to plant bulbs now, so they are going to grow roots before the ground freezes.

For maximum color effect, plant crocus, daffodil, hyacinth or tulip bulbs in massive swaths rather than in a single row.

Shown: Blue hyacinth

Noelle Johnson Landscape Consulting

Grow your garlic. Plant garlic now for a yummy harvest next summer. Garlic is very easy to grow. Only plant person tsp 2 inches deep in your vegetable garden or in a container. Plant each clove with the pointed end up, 6 inches away from each other in rows which are just 1 foot apart.

Noelle Johnson Landscape Consulting

Preserve the flavors of your summer garden by drying herbs. Herbs can readily be dried by tying them in bunches and hanging them in a dry, dark location. Drying takes. When the herbs are dry, then crumble the dried leaves into small pieces, keep them in sealed jars and use them to flavor your favourite dishes.

Prepare for October. Plants need less water as the temperatures cool, so adjust your irrigation control as needed.

See related

Set Your Shade Garden Aglow With Light

Light and life are inextricably related. From its beginning, the human race has worshipped, celebrated and sought to catch light. And I feel that gardeners, over most people, are aware of lighting: how it affects our plants and the way it influences our moods. Phototropism (how plants grow toward sunlight ) and seasonal affective disorder are just two examples of its effects.

People appear to desire what they apparently can’t have. People with straight hair want curly hair. People that have curly hair want straight hair. Shade gardeners want more sun. Sun anglers desire more colour. My personal garden resides in partial to full shade. Through the years I have celebrated it, cursed it, embraced it and tweaked it. My garden has gone through this procedure with me, indulging me, being patient with me and sometimes fighting back at me. Finally, my garden is all the better for it, as am I. We’re at peace.

Let me take you on my journey. If your garden is a color garden, I think that I can help save you time, money and frustration. Let’s take a stroll and have that dialogue.

Jay Sifford Garden Design

Take inventory of the way that light plays in your own garden. Since most gardeners realize, a truly great personalized garden takes some time to develop. This type of garden is no one-weekend DIY project, regardless of what television commercials preach to us. A fantastic gardener is one who has developed a keen sense of observation. An experienced gardener knows that sunlight strikes her or his garden differently at various times of year, the intensity of the sun ebbs and flows with the seasons, and that the color of sun varies with its own intensity.

Whether you are in the process of initially developing your colour garden or at the continuous process of renovating and editing, take a year to really notice how light interacts with your garden. Take photographs or maintain a journal to document your findings. Your garden is going to be better for it.

On the edge of my pond, beside the largest waterfall, is a flat boulder I affectionately call my”wine stone .” I sit in the evenings with coffee or in the day with a fantastic malbec, watch the koi and reflect in your life.

I shot this movie one day in late spring, when the morning sun appeared through the trees and flawlessly choreographed the interactive dance between the hardy begonia (Begonia grandis, zones 6 to 9) and also the fall fern (Dryopteris erythrosora, zones 5 to 9). This only happens for a few minutes daily, but what a spectacular way to begin the day. I wouldn’t miss it.

Ron Yeo, FAIA Architect

Consider pruning, limbing up or elimination to open up your distance. Your garden space will talk to you if you open your mind and soul and just listen. My approach to garden design incorporates a bit of mysticism, as I feel that a distance will enable you to know what it yearns to become. A successfully implemented garden is a cooperation between what the space says and the way the gardener interprets this speech. This skill comes naturally to some people but is a learned skill to most. If you are having trouble in this area, don’t hesitate to request the help of a fantastic garden designer or landscape architect with whose work you are familiar.

Once you have a vision to the shape and scope your garden needs to take, you might find it necessary to prune, thin saplings or limb your trees up to create an environment that welcomes sun. You might also need to hire a fantastic arborist to remove trees that are detracting from the overall feel of your garden or inhibiting your sight lines. This occasionally requires fortitude, but your garden will thank you in the long run.

Chicago Specialty Gardens, Inc..

Embrace the art of backlighting. Some of the mundane plants in your garden will suddenly take on fresh vibrancy when placed in front of available light.

Some of the best plants for this technique are the ones that are translucent by nature, the ones that catch and diffuse light.

My favorite translucent plant is the sometimes-invasive horsetail rush (Equisetum hyemale, zones 3 to 11). Its 3- to 4-foot vertical growth habit is an ideal foil for a curved or rounded sculpture, or a clumping shrub. Just make sure you contain it, lest it spread indefinitely.

Jay Sifford Garden Design

Aside from backlighting an individual plant, you can backlight an whole garden scene. This photo shows a magic late-afternoon garden second. Who wouldn’t wish to return home to this after sitting at rush-hour traffic?

Harold Leidner Landscape Architects

Catch reflections on water. Water features are excellent instruments to use in our quest for inviting light into our garden spaces. Water churns, bubbles, spills and cascades, all the while catching light in ever-changing ways. A correctly sited and designed water feature may be a mesmerizing focal point.

I wholeheartedly suggest that you consult a pond specialist, and that you view her or his work in different gardens, before you design and set up your own pond. A badly constructed water feature will probably be an expensive disappointment.

Locate pond designers on

Jay Sifford Garden Design

Watch ice light the winter garden. Most of us think ponds to be warm-weather features that are coated, drained or place to bed for winter. Your pond may reinvent itself in winter, performing double duty as a cold-weather garden focal point. Consider the captivating elegance of ice because it forms at a pond. Notice the way its opaque beauty captures the winter light better than any artist could.

Jay Sifford Garden Design

Insert glass. Nothing catches, reflects and refracts light such as glass. The pieces shown here have been custom designed to mimic fresh shoots of plant growth and placed so that they rise out of a sea of shade-loving ground cover.

One thing to consider before installing a glass sculpture in your garden is potential breakage from overhead limbs falling in inclement weather. Assess your financial plan and tolerance amount for reduction before purchasing your glass. If you decide to put money into a glass garden sculpture, then you’ll get shining rewards.

Jay Sifford Garden Design

Let light project onto a screen. Much like the drive-in film theaters of the past, you are able to project light in your garden, capturing its movement and nuances, by erecting a wall or screen, or perhaps by enlisting the side of your residence. This three-paneled privacy screen, built from concrete backer board like you’d find beneath a tile flooring, faces west and jobs a virtual documentary of the day sun. Who wouldn’t wish to watch this light display?

Margie Grace – Grace Design Associates

Create the illusion of light with chartreuse foliage. The human eye generally reads sun as having a yellow cast. You can present the illusion of light into a color garden by introducing plants using chartreuse foliage. This photograph illustrates the principle brilliantly. Do not you almost wish to squint when you view this photo? On a closer look, you understand this really is a shaded area, the impact of sun is an illusion.

Pulling off this illusion does require some skill, but here are some tips to get you started.
Begin by observing the way that shafts of sunlight pierce the tree canopy in your garden and the consequent shape on your garden floor. Is it an elongated triangle, a line or a patch? Leave your plants in their pots and arrange them in this pattern until the outcome is gratifying to you. Easier still, wait till the sun creates its distinctive shape on your garden flooring, then trace the pattern with your potted plants.
Among my favorite chartreuse-leafed plants for you to consider, taking into consideration your specific growing requirements:
‘Sun Power’ and ‘Sum and Substance’ hostas (Hosta cvs, zones 4 to 9)‘All Gold’ and‘Aureola’ Japanese forest grass (Hakonechloa macra cvs, zones 4 to 9)‘Orange Fantasy’ Japanese walnut (Acer palmatum‘Orange Fantasy’, zones 5 to 9)Golden sweet flag (Acorus gramineus‘Ogon’, zone 5 to 9)Scotch moss (Sagina subulata‘Aurea’, zones 3 to 9) ‘Skylands’ Oriental spruce (Picea orientalis‘Skylands’, zones 4 to 8)
Note that plants with chartreuse foliage require at least a few hours of sun to carry out correctly.

Katia Goffin Gardens

Insert plants with white flowers or foliage foliage. Nothing brightens a color garden such as white flowers and foliage. While white doesn’t imitate sun quite as well as chartreuse, it’s still quite effective in providing the illusion of lighting. It’s also especially effective at dusk, when it appears to glow.

What’s a color garden without a minumum of one hydrangea? Before buying your hydrangea, do some quick research on the types best suited to your location.

The oakleafs and mopheads are much better suited to colour, whereas the paniculatas require sun to achieve their thriving possible. ‘Little Honey’ (Hydrangea quercifolia‘Little Honey’, zones 5 to 9) combines the best features for our discussion since it may take colour or partial sun, also has chartruese foliage and white flowers. Another one of my favorites is ‘Incrediball’ (Hydrangea arborescens ‘Abetwo’, zones 3 to 9). Its nondrooping 12-inch flower heads are real showstoppers.

Some plants with variegated foliage that you consider are bugloss (Brunnera macrophylla, zones 3 to 2 ),’Patriot’ hosta (Hosta‘Patriot’, zones 3 to 2 ),’River Mist’ Northern sea oats (Chasmanthium latifolium‘River Mist’, zones 4 to 9), also’Floating Clouds’ redbud (Cercis canadensis‘Floating Clouds’, zones 5 to 9).

Possidento Lightscapes LLC

Invest in garden light. Nothing animates a garden quite like good-quality lighting. This spectacular photo says everything. There are a number of points to consider before light setup. Do your research concerning technology, yearly utility cost, and fixture and bulb life.

LED light has come a long way in just the last couple of years and is extremely economical as time passes. Buy the best-quality light you are able. Cheaper lighting is going to wind up costing you more in the long term, in terms of both replacements and electricity usage.

Most significant, decide which focal points should be illuminated and which ones are better left to daylight. There is a fine line between just enough light and also much. Consider the enchanting elegance of shadows and shadow to gain the most from light your garden.

I have seen way too many DIY lighting jobs that wind up looking like the vegas strip. If you are not gifted with an eye for design, please consider having your system designed and installed by a certified professional with whose work you are familiar.

More:
Discover outdoor lighting experts on
The 3 Best Ways To Light Up Your Landscape

See related

Transition Time: How to Connect Tile and Hardwood Floors

Transitioning a bathroom’s tile floor into the wood of some other room is often given little forethought. However, not going the transition could cause a final product which doesn’t satisfy your expectations, or even a floor assembly that is destined to fail.

Most of the floor framing in North America is designed to fulfill a base business standard. This regular (usually quantified as a deflection score) enables for materials such as little ceramic tile, vinyl, carpet and wood to be used on floors. However, these days a lot of my customers want large, natural stone tile.

Many also want the tile to transition seamlessly from one room to another. This can be done, but most homeowners don’t know that their home has to be equipped with extra strength and rigidity to carry this weight.

Below you will learn what to define when planning a transition from tile flooring to hardwood.

The Turett Collaborative

This bath is a great example of current trends in bathroom design: plenty of room, bright light, a good soaking tub and a walk-in barrier-free shower.

Notice the flush transition out of hardwood flooring to tile. Looking closer (click on the photograph to enlarge it), you will understand that the tile is large (approximately 1 foot by 2 feet) and made of marble; both attributes require a more solid floor than most houses have.

Tip: If you’re working with large-format tile or natural stone, define that your rooms fulfill a stronger deflection score: L/720, rather than the base-standard L/360. This number indicates how much flex a floor has before tile is set up — both the Tile Council of North America (TCNA) and the Terrazzo, Tile and Marble Association of Canada (TTMAC) need L/720 for thick installations.

kbcdevelopments

Many of today’s floor tile is ⅜ inch to 3/4 inch thick. Most hardwood flooring is 3/4 inch thick. It follows that when you place tile beside hardwood flooring, your tile selection will be critical to get a flush transition.

Simply tiling along with a plywood subfloor is not an option — this practice is frowned upon and is not allowed by the TCNA or even TTMAC. Nevertheless, you can install a thin uncoupling mat (such as Laticrete’s Strata Mat or Schluter Systems’ Ditra) to fulfill with the tile business’s requirements.

Tip: Installing another layer of plywood over your subfloor and under your hardwood enables for more floor preparation options later on. In addition, this is a valid option if your house’s floor joists were not designed for a stronger, thicker floor. Nevertheless, this should be planned early on, since it affects how your stairs and stair risers are built.

Here’s an action shot of timber being installed over an uncoupling membrane out of Laticrete, which adopts the plywood subfloor for tile.

Tip: If your floor is not powerful enough to satisfy the right deflection rating, an uncoupling membrane will not help. Increasing the floor joist width or adding another layer of plywood is a much better and safer option.

Before Photo

Tarkus Tile, Inc..

Here Tarkus Tile is prepping to get a tile installation with another layer of plywood and an uncoupling membrane. The orange substance (Schluter Systems’ Ditra) was set up with a quality modified thinset (mortar). Since this house’s existing framing wasn’t suited to maintain the new tile choice, the installers beefed up the subfloor to make sure that the installation would last for many years to come.

Tip: The selection between a flush installation from tile to hardwood and one which meets business guidelines shouldn’t be a hard one. Always follow industry guidelines! They will most likely be stricter than local construction codes.

This custom walnut transition helps adjust for the difference between the bathroom floor and the bedroom floor in this master suite. This is often referred to as a reducing wood transition, since it functions with two surfaces, reducing their height differences.

We focused the tile installation below the door, so as soon as the door is closed you see only tile in the bathroom and walnut in the bedroom.

Tip: I discover that these alterations seem cleaner if the door jamb (the perpendicular area of the door frame) overlaps the tile just a bit. However, this is hard to do if the tile has not been set up yet. If you can, install your bathroom door after the tile installation.

Megan Buchanan

The simplest way to link floor tile and hardwood of different heights is with a transition strip. These strips may be finished to look like the ground or painted to stand out.

Tip: Leave ⅝ inch to 3/4 inch of space based underneath the door for the base of this transition strip. Should you affix a bit of scrap baseboard or plywood in precisely the exact same dimensions, it’ll help keep this channel clean of thinset, making the transition strip simpler to install.

FRONTIER FLOORING

A custom made transition could be milled by your floor contractor for installation after the tile is complete. Notice in which the wood transition matches the tile — the wood is not cut into a feathered edge but kept to approximately ⅛ inch thick. This produces the advantage stronger. The transition also overlaps since tile and wood expand at different rates, the tile, which assists with motion.

More: 20 Great Examples of Transitions in Flooring

See related

Budget Decorator: 8 Ways to Make Mature Furniture Look Brand New

Staining, stripping and whitewashing, oh my! If you would like to revamp a well-loved old piece of furniture but are not sure where to start, this manual is for you. Here you will find tips for when to use what technique, along with some invaluable how-to advice.

Susan Duane

1. Strip finishes. This is not an easy task and definitely is not advisable for anybody with respiratory issues to tackle — but aside from those caveats, stripping your own old furniture may save you money and produce good outcomes.

Tools of the trade: Chemical stripper (note the faster-acting strippers will also be the most poisonous), solvent respirator with new filters, safety goggles, chemical-resistant gloves, work apron, brushes, scrapers and steel wool.

DOXA Home

How-to: Move the piece to an outdoor location or well-ventilated garage and remove any hardware. It is crucial to protect yourself from the caustic fumes of a chemical stripper (see the list of safety equipment above).

After you brush the stripper, the paint must start to bubble up. Use a scraper or steel wool to remove the layers of paint. Afterward, be sure to give the piece a coat of mineral spirits or denatured alcohol to remove traces of this stripper.

Theresa Fine

2. Stain wood tables and seats. For those who have an old solid wood piece of furniture, then look at staining rather than painting it to show off the wood grain. The walnut dining table shown here was a Craigslist locate — it had been initially orange, along with the homeowners stripped it and gave it a lovely dark end.

Tools of the trade: Sandpaper, wood conditioner, rubber or nitrile gloves, wood stain, soft fabric and polyurethane varnish.

Theresa Fine

How-to: Starting with stripped wood, smooth the slice with vacuum and sandpaper or rub away all dust. Implementing wood conditioner will help the finish proceed more evenly.

Rub the wood stain evenly using a soft fabric (you may want to use a number of coats) and finish with a coat of polyurethane.

Before Photo

Wild Chairy

3. Reupholster a classic. Taking on an upholstery project takes some significant DIY skills — but if you’re patient and prepared to learn, it may be carried out. Andrea Mihalik of the reupholstery biz Wild Chairy learned her craft by studying an upholstery book and recommends that potential DIYers do exactly the same.

Tips: Take photos at every step as you take apart your seat; save the first cloth pieces to use as a pattern.

When to find an expert:
as soon as your bit has structural issues or uncomfortable springs. A pro can completely rebuild your chair … maybe not something the average person ought to try in your home.

Watch our interview with Mihalik for much more seat makeovers and DIY upholstering tips.

How to Work With an Upholsterer

Studio Marcelo Brito

4. Whitewashing, liming and pickling. You can achieve a faded, cursory appearance using lots of methods. What they all have in common is they lighten wood whilst still allowing the grain to show through.

Tools of the trade: Brass or copper wool or brush, sandpaper, liming wax, liming alternative or primer, soft rags and very clear wax or clear polyurethane.

perfectly imperfect

How-to: Rough up the wood using a copper or brass brush to allow the whitewash to stick better. Sandpaper and vacuum the face or wipe the dust away.

To lighten the wood, you may use liming wax, liming wash or a way of primer and water, working it in with a rag. If you’re using wax, remove excess wax with fine steel wool and seal the surface with wax. If you’re using primer or liming alternative, wipe off the excess with a rag. When the piece is dry, then seal it with a coating of polyurethane.

5. Milk paint. The most natural type of paint on the current market, true milk paint is really made out of milk; it comes in powder form and you mix up the paint yourself. It is nontoxic, comes in a wonderful range of customizable colors and functions on unfinished or finished wood surfaces.

Tools of the trade: Buckets and stir sticks for blending, paintbrushes and shed fabric.

Rethink Design Studio

6. Latex and oil paints. First, which to select? Latex paints have the distinct advantage of being water soluble, which means cleanup is as simple as dunking your tools in a bucket of water.

Oil-based paint necessitates taking more safety measures: The fumes imply it is best to work outside; harsh chemical solvents are needed for cleanup; also you must bring all leftovers to a hazardous waste center. The advantages of oil-based paints are better coverage and, some say, richer colors.

Tools of the trade: Fall cloths, sandpaper, mini foam rollers, painter’s tape, primer, latex or oil paint, and solvent for oil paint.

Amoroso Design

How-to: Eliminate all hardware and drawers, and set the piece up on bricks or wood blocks on top of a drop cloth. Sand lightly and wipe out dust. Tape off the edges of the drawers as needed with painter’s tape. Give the piece a coat of primer and allow it to dry.

For painting, then use a small roller to get a smooth program without adhesive lines. Start at the top and work your way down; let the paint dry thoroughly between coats.

Adrianna Beech

7. Spray paint. For outdoor furniture, nothing beats a couple of coats of spray paint. Decide on a formula created for outdoor furniture, and it will stand up well to the elements.

Tools of the trade: Outside furniture spray paint, rubber gloves, painter’s mask and fall fabric.

How-to: Gently wash the furniture, scrubbing off scuffs and rust, and let it dry thoroughly. Wear rubber gloves and a painter’s mask while spray painting. Working outside on a drop cloth, spray on the furniture with even strokes. A number of light coats will provide even coverage with no a lot of drips.

Caitlin Wilson Design

8. Re-cover a seat cushion. Unlike a complete reupholstery job, re-covering a seat cushion is a relatively simple and gratifying project.

Tools of the trade: Staple gun, new cloth and foam or batting.

How-to: Unscrew the seat cushion from the seat. Eliminate the old cloth and use it as a template to cut new fabric. If the batting or foam cushion is very worn, replace it. Wrap the new cloth over the seat and use a staple gun to attach it. Screw the seat back in place.

Step-by-step directions: How to Re-Cover a Chair Cushion

See related

Show Us Your Great Patio, Deck or Rooftop!

I’m putting my Basement of the Week series on hold for the summer to get us away in the underground spaces and outside during the wonderful weather. We’ll be featuring a great terrace, deck, rooftop or other imaginative backyard space each week. We are looking for jobs from homeowners as well as pros, so get out your cameras, get a great shot and provide your new outdoor space its big break.

Shoot us a picture of your space and post it in the Comments section below. If we choose it for a featured ideabook, we will want at least four high quality, high-resolution shots; they could be a mix of the entire space, smaller areas within it and close-ups. They don’t have to be accepted by a professional, but they do need to be in focus, nicely lit and large (at least 1,000 pixels wide).

McClellan Architects

If you’ve got beautiful environment, we’d really like to see that the views from the terrace as well.

PLLC, Lynn Gaffney Architect

Let us know where you are located and how you enjoy your outdoor space. Can you sunbathe, entertain or see the little ones as you enjoy a cocktail, have foods or toast marshmallows?

Spore Design

Be prepared to have a tiny phone or email conversation with yours truly in the event you are interested in getting your deck or patio comprised as a Patio of the Week. I guarantee it will be quick and painless.

LOCZIdesign

Paul Davis Architects

Pros and amateurs are both welcome and will receive equal attention. I look forward to seeing everybody’s spaces. Bring them!

See related

Spring Patio Fix-Ups: 12 Ways With Planters

Whether you use these to pay up flaws, ramp up fashion or just delight your senses, there is little that the right planters (filled with the proper plants) can’t do. And unlike intensive projects, such as building a new deck, setting out fresh pots are readily achieved in a weekend. From conventional topiary to modern bullet planters, wall gardens into privacy screens, let these 12 creative ideas motivate you to make your terrace glow.

MB Build & Design

1. Use planters to create privacy. Lush greenery, tall grasses and trailing flowers create a pure privacy screen on this terrace. Try putting large window boxfashion planters atop a low wall to achieve a similar impact.

Alex Amend Photography

2. Create a garden that is formal texture with topiary. Neatly trimmed topiary in identical pots brings the look and texture of a formal garden into a terrace. Pick tall, sleek figurines such as those shown here to get a modern look, or try massive urns if conventional style is exactly what you love.

Bright Green

3. Plant a wall garden. As intricate and beautiful as a work of art, a wall-mounted garden can be the focal point of a terrace. Try your hand at a smaller-scale variant or hire an expert to design something similar to what is shown here.

Tara Bussema – Design and Neat Organization

4. Go mod with bullet figurines. The iconic kind of these planters immediately dresses up a modern terrace. One or two are all you need to make a big impact.

Watch more about bullet figurines

Margie Grace – Grace Design Associates

5. Channel a traditional Italian garden with an urn that is oversized. It is hard to beat the love of a weathered urn brimming with blooming roses and trailing ivy.

Revealed: Iceberg Rose with Glacier Ivy

Integrated

6. Plant a dwelling privacy wall. Long, low planters full of palms offer privacy on a metropolitan patio. Check with your regional garden center to find types that can do well with the mild conditions on your terrace.

Kenneth Philp Landscape Architects

7. Learn how to combine plants in a single pot. It can be tough to know which plants to match — take the guesswork out of it using this useful guide from picture designer Margie Grace.

Avant Garden

8. Take a cue from cafés. Carve out a specified patio area inside a larger yard with extra-large planters around the border. Fill the planters flanking the entrance with trees and complete the look with some strategically placed umbrellas.

Arterra Landscape Architects

9. Accent your seating room using a tabletop cactus garden. Fill out a shallow, round container with one or more types of cactus for a tasteful display. Complement your desert planting with raw wood furniture, smooth stone and chunky carved candlesticks.

SB Garden Layout

10. Bring climbing plants into new heights using a wire trellis. Less anticipated than wood, a metal framed trellis gives the terrace an appealingly rustic look. The custom trellis design shown here is by SB Garden Layout.

Arterra Landscape Architects

11. Delight the senses. Encourage roses, jasmine or a different blossom blossom to scale over a pergola or trellis to get a sensory treat.

Logan’s Hammer Building & Renovation

12. Window boxes — not only for windows. Frame a view in an elevated terrace with a row of window boxes placed along the border.

Inform us What is your favorite way to use planters?

See related

Out Of Baseball Factory to Homey Loft at Toronto

When Robert Van Every casually popped to a neighborhood open house one day in Toronto, he was not expecting the attic to blow him away. But the distance was just what he’d always wanted. Located inside a former Rawlings baseball glove factory constructed in 1902, the area needed an industrial shell which held contemporary finishes, 10-foot ceilings, original wood beams and exposed brick. “I immediately began imagining myself alive here; it was really meant to be,” he states.

He purchased the attic and got to work filling the area with standout classic furniture for a smart but dim look which permits the many expansive windows to play a constant loop of the West Toronto area. “This is my final dream house,” Van Every states. “It is what keeps me inspired.”

in a Glance
Who resides: Robert Van Each and his greyhound, Jason
Location: Roncesvalles area of Toronto
Size: 1,300 square feet; 1 bedroom, 2 bathrooms

Jenn Hannotte / Hannotte Interiors

Windows wrap the attic, flood the area with light from the north, south and west, while warm wood ceilings and floors soften the exposed brick.

Van Every maximized space with a large sectional, weighty bronze lighting and a coffee table he created with old crates and a classic marble top.

Sofa: Mirabel, Domison; rocking seat, Thonet, Worth Village; lighting: Bronze Copper Pendant, Tom Dixon; rug: Alvine Ruta, Ikea

Jenn Hannotte / Hannotte Interiors

The elevation and openness of this loft initially drew Van Every to the distance, which, he states, lends itself very nicely to entertaining.

The fireplace was not something he believed he’d ever desire, but he can not imagine living without it.

Jenn Hannotte / Hannotte Interiors

On the very first night in his new attic, a couple of days before Christmas, as he waited to get the paint to dry in his bedroom Van Every place his bed on the floor in front of the fireplace and curled up with a glass of wine. That moment may have been the impetus for the positioning of the greyhound’s bed nearby.

Jenn Hannotte / Hannotte Interiors

The kitchen had aged, although the attic had not been remodeled since the ’80s. Concrete flooring set the space apart from the wood-floor living room.

Green seat: Value Village; taxidermy, Smash!

Jenn Hannotte / Hannotte Interiors

The kitchen’s galley style helps keep the jumble of entertaining confined to the wide-open living spaces. A Persian-inspired rug, combined with a taxidermy deer head and also a midcentury armchair, adds eclectic flair.

Rug: Valby Ruta, Ikea

Jenn Hannotte / Hannotte Interiors

Van Each created this small seats nook off the kitchen ; he enjoys his morning coffee and news. “My decorating philosophy relies on expertise,” he states. “I imagine how I wish to use a space and then work out the best possible furniture positioning. Each area has a reason to be.”

Suitcases double as storage due to their favourite magazines.

Seat: Papa Bear, Hans J. Wegner

Jenn Hannotte / Hannotte Interiors

Van Every’s favorite recent purchase is a bright aqua Era seat he found on Craigslist.

Chair: Era, originally from Design Within Reach; dining table: Stornäs, Ikea

Jenn Hannotte / Hannotte Interiors

The sunken principal bedroom is an exercise in simplicity, with intricate empty frames and a simple hanging pendant lighting which illuminates the hot wood ceiling.

Bed: Svelvik, Ikea

Jenn Hannotte / Hannotte Interiors

The building allows Van Every, revealed here with dog Jason, to walk and bike to virtually everything in the Roncesvalles area of West Toronto, where he’s lived for the past five decades.

Your turn: Show us your attic!

See related

Kitsch and Humor Meet Midcentury Modern

Clean lines, good bones and a quintessential midcentury apartment roof attracted James and Cindy Stolp to their Dallas house, despite its poor state. “The home was in horrible shape, but we knew we wanted it the moment we stepped inside,” Cindy says. “We definitely had on our ‘possible’ glasses when we bought this home,” James adds.

James, a designer and cofounder of smart-home-technology firm Smart Things, and Cindy, a freelance interior designer and stylist, each have a strong personal aesthetic. Their love of contemporary design, pop art, kitsch, graphic and typographic layout, architecture and midcentury design informs each inch of their property. “We’ve got a sense of humor,” says Cindy. “Modern design could be so uptight, but we wanted our house to be warm and approachable — a place where our kids would like living.”

at a Glance
Who lives here: James and Cindy Stolp and their sons, Jack (age 5) and Mike (3)
Size: 2,000 square feet: 3 bedrooms, 2 1/2 bathrooms
Location: Highland Meadows neighborhood of Dallas

Sarah Greenman

Kitschy art, midcentury furniture and contemporary light fixtures make for an eclectic yet cohesive combination from the dining area. The Heywood Wakefield dining place and two midcentury hutches placed side by side keep the room grounded with honey-colored wood.

Table, chairs: Strictly Hey-Wake; pendant lighting: West Elm; art: We Are 1976

Sarah Greenman

The Stolps bought many of the furnishings online. “Cindy isn’t afraid of getting furniture shipped,” James says. Some of her favorite sites are Furnish Me Vintage, Etsy, eBay and Fab. The pair looks to Lula B’s for furniture and accessories and We Are 1976 for art when shopping locally.

Paint: Iced Cube Silver, Benjamin Moore

Sarah Greenman

A badly constructed remodel in the 1980s divided up the house into little spaces. The first thing that the Stolps did was remove the walls and open the main living area to a fluid space.

They also installed a bank of windows across the rear side of the home. The rectangular window theme repeats throughout the home.

Club chairs: Fab

Sarah Greenman

“Some of the significant design challenges in this home was furniture placement,” says Cindy. “I wished to keep the house from feeling like a giant bowling alley.” Therefore the Stolps created separate seating areas while still maintaining ample room for visitors flow.

Bookcase:
Ikea

Sarah Greenman

A blue-gray tile fireplace, circular shag rug and midcentury sofa make another comfy seating area at the far end of the main living space.

“The watch artwork is titled ‘A Mother’s Love.’ It is by Oklahoma artist Matt Goad and has been a present from James to me for our 15th anniversary,” Cindy says. “The baby bears are such precise representations of the boys. It is difficult to surprise me, but I was shocked by this bit, and it remains the funniest present James has given me.”

Sarah Greenman

Before going into their house, the Stolps dwelt in a loft apartment in the Deep Ellum neighborhood of downtown Dallas. “We’re so accustomed to attic living we re-created the attic feel in our house,” says James. Wide-open spaces, light walls and lots of natural lighting are hallmarks of this home.

Sofa: Lula B’s

Sarah Greenman

A little half bath close to front door pops with dim gray walls, a wall-mounted sink and thematic travel art.

Paint: Rocky Coast, Benjamin Moore

Sarah Greenman

A little anteroom is the best spot for a TV, sofa and classic movie posters. “We had such a hard time locating a sofa that would fit in the space we ended up using one custom made,” James says.

Sofa: custom, Cantoni

Sarah Greenman

Space tends to be lacking most midcentury houses, so the couple use an oversize Italian kitchen unit referred to as a schränke to carry things in the eat-in kitchen. “No loft, no garage and terrible storage means we must find creative,” says Cindy.

Pendant mild: FL/Y Suspension Lamp by Kartel

Sarah Greenman

The kitchen includes a glowing smattering of orange, blue, gray and wood accents.

Fiberglass bar stools and a trio of pendant lights bridge the space between the kitchen and the dining space.

Bar stool foundations: Modernica

Sarah Greenman

The Stolps maintained the wood cabinets but updated the space with stainless steel appliances.

Backsplash tile: ModWalls

Sarah Greenman

They created a play area off the kitchen for their own sons, Mike and Jack. “I wanted them to get their very own play space where I could watch on them,” Cindy says. The carpeting floor tiles specify the area and make the sensation of a room within a room.

The conical pendant lighting in the corner of this room is original to the home. Cindy rewired many of the original fixtures with assistance from Royal Touch Lamp & Fixture Service.

Table, chairs: Area; storage device: Stuva, Ikea; place carpeting: Flor

Sarah Greenman

Wall-mounted shelves and a Herman Miller desk chair keep the house office tidy and stylish.

Shelving: Lula B’s

Sarah Greenman

Cool aqua and daring green brighten Jack’s bedroom. The Stuva storage system from Ikea keeps toys, games and clothes tucked away.

Paint: Hazy Blue, Benjamin Moore

Sarah Greenman

Mike’s area comes alive with bright green with blue accents. “Kids deserve good layout, and our boys are extremely happy with their bedrooms,” Cindy says.

Paint: New Grass, Benjamin Moore; storage: Stuva, Ikea

Sarah Greenman

Sugar cube tile in a double sink from Kohler create the boys’ bathroom a showstopper.

Sarah Greenman

Simple furnishings and ice blue walls make for a calm main bedroom. Each of the home’s three bedroom doors includes a tiny rectangular window on top. “We were planning to put frosted glass in the doors, but then I decided against it when I realized that I could glance in at the boys while they were sleeping,” Cindy says.

Paint: Hazy Blue, Benjamin Moore; bed frame: Russel Wright Studios; bedding: Draper Stripe, DwellStudio

Sarah Greenman

“When we first saw the home, we fell in love with the apartment roof. But horizontal roofs are high maintenance,” says Cindy. “Whenever it rained, I’d start pacing through the house looking for leaks.”

“The roof was also badly insulated,” James says, “along with the Texas heat would beat down on it. We could not keep the home cool.”

A brand new roof with appropriate insulation, ventilation, furnace and drainage operate ran the Stolps $17,000. “It was worth every cent,” says James.

Roofing: Tillery Roofing Service

Sarah Greenman

James and Jack high-five from kitchen. “When we moved in, nine years ago, the neighborhood has been in transition,” James says. “Our friends thought we were mad, since the place was economically sad and sort of beat up. But Cindy and I had faith in it, and it feels like the sun is shining on Highland Meadows.”

See more photographs of this home

See related

Travel Treasures Personalize a Denver Comedian's Home

When comedian Adam Cayton-Holland is not traveling to perform stand-up, he’s enjoying his 1885 Victorian in Denver. Although the avid traveler — 30 countries and counting — told jokes before this season on Conan, he takes himself seriously enough to provide his house with purpose, displaying artwork and collectibles from his excursions. With an eclectic mix of family heirlooms and travel memorabilia influenced by Cayton-Holland’s dad and art-collecting grandfather, this hot and innovative atmosphere provides a welcome intermission between gigs.

in a Glance
Who lives here: Adam Cayton-Holland along with his puppy, Annabel
Location:Baker neighborhood of Denver
Size: 1,500 square feet; 3 bedrooms, 2 bathrooms

Lauren Mikus

Cayton-Holland relaxes from the master bedroom along with his puppy, Annabel. “I remember bringing her to my home for a puppy, and I thought, ‘Now this is my property,'” he states.

“I travel a lot for work, and when I come home, among the first things I do is walk my puppy. I like to check on the few-block radius round here and see what, if anything, has changed. Folks say they always find me walking my puppy. It’s my way of announcing, ‘Hey I am back.’ I like things like this.”

Lauren Mikus

Cayton-Holland regularly hosts friends and fellow comedians in his bedroom that is . “A lot of comedians come into town for a monthly stand-up comedy show I do called The Grawlix,” he states. “People are always wanting to come in town for it, so we try to fly comics and then they wreck together with me for a few days. I prefer trying to give them a wonderful spot to stay.”

Lauren Mikus

He’s traveled all around the world and at a single point called the Spanish city Santiago de Compostela house. So obviously, virtually every decor piece in his house includes a narrative along with a passport stamp. A print in the Ecuadorian artist Oswaldo Guayasamin hangs over a vintage record player. A classic Indian wood carving out of Denver’s Antique Row on South Broadway hangs in an adjacent wall.

This dining set, nevertheless, is a family heirloom.

Lauren Mikus

The comedian attributes his style — what he describes as that of a “tenured professor’s office” — to his father, a civil rights lawyer, and grandfather, who was an art dealer. When he was growing up, his father “needed a room we called ‘the library’ because of the number of books,” he states. “My father had only festooned the place with paintings — Indian arrowheads, old binoculars, garudas from Indonesia, Persian carpets, old lamps. It’s very eclectic, but everything gets the feel of being a treasure. I have always wished to emulate ‘the library’ from the living room.”

It was a challenge to distinguish the living room and dining room, but afterwards what Cayton-Holland describes a “war of attrition,” he now loves his open area. “I slowly acquired more and more stuff, which I deemed fitting of the space, and now it seems full and lively. I am still moving. Next I need a player piano.”

A kitchen rug, just past the dining room, hides a panel that opens to a stairway leading into a basement. The previous homeowner was a contractor who upgraded the area, and this is one of their home’s few untouched original features. “To get down to the basement, you have to scale down,” the homeowner says. “It’s kind of terrifying but also really cool, because you can see the skeleton of the home and an old staircase I assume led up to storm-shelter doorways now just goes nowhere.”

Lauren Mikus

The homeowner and his dad are known to regular antiques shops and are great friends with local antiques dealer Rick Rose.

The antique chest here originated out of a Mexican monastery and dates back to the late 1800s. The three birdcages are also antiques.

Lauren Mikus

Typical of early-20th-century homes, the walls in this house are extremely thick. Red paint adds dimension to the doorway between the dining room and the kitchen.

Lauren Mikus

Masks from Senegal line the stairs from the foyer to the next story.

A vintage window framework that has been a Christmas present from Cayton-Holland’s sister hangs out of the 14-foot ceilings.

Lauren Mikus

The foyer’s mission-style furniture piece is from an antiques shop in Colorado Springs and holds the homeowner’s many hats.

Lauren Mikus

Once leased to a roommate, this space is now tCayton-Holland’s office, using a mission-style desk, chair and lamp.

Mexican folk art retablos and tapestries out of Mongolia and Indonesia adorn the wall.

Lauren Mikus

Cayton-Holland sometimes performs in Los Angeles in The Meltdown, linking other comics, such as Pete Holmes, Rory Scovel and Brent Weinbach. The place is found in the back of a comic shop, and for each display a poster is made. Some of them decorate the cupboard doors.

Lauren Mikus

Cayton-Holland relaxes on front porch with Annabel. “I am always visiting new cities, and I always love returning to Denver,” he states. “It’s fun to be a part of a city that’s constantly defining itself, that no one has really written the book on yet. This makes you feel a part of something. There is a spirit of anything that you need to see or do, you can do it here.”

See related

House Hunting? Look kindly at the Light

When I was growing up, my mum could bemoan others’ restricted imaginations: “Some folks can not see possible; they just can’t picture things.”

My difficulty was not a lack of creativity. An argument may be made that I’ve had too much creativity, bordering on delusion. Take the second house my husband and I purchased. When there had been a category on Facebook for posting the status of someone’s relationship with one’s house, mine could have stated, “It is complicated.”

Let us start with the good things: It was in a beautiful setting with a pool, large yards and many gardens, surrounded by lovely woods. It was near my husband’s office and in a fantastic school district. Most important of all We could afford it.

A wall of windows overlooks natural lighting and the view.

Today you want to brace yourself. The prior owners were DIY-ers from the 1970s. That about says it all, however, I will press on with all the details. There was wall-to-wall carpet everywhere, and I really do mean everywhere: bathrooms and kitchen included. The ceilings laughed at mere popcorn, aspiring to stalactites. Are you seated? Because I am just getting started. Faux beams? You betcha! Cedar shakes? A wall of them! Fake brick? Two partitions! Paneling? Eight rooms and seven fashions! Volcanic-looking rock? Going all the way up the staircase! I knew it was a nightmare, however, I watched all the possibilities. I knew we could sand ceilings and paint paneling and tear out the carpet as well as the faux everything. And we did. We went room by room, including windows and replacing, retexturing and repainting walls, ceilings and floors — from the day we took ownership until days before it burned down. However, all this was only makeup; there was more.

We fulfilled our house on a rainy day so, not surprisingly, it was dark inside. The entrance led to the dining room, which was the center of the house. To the north was a doorway to a hall that led to a bath and bedrooms. However, the east wall was a door to another bedroom. To the south was a large archway that opened into the kitchen and the rest of the house. On the other side of the west wall were the mudroom and the garage. That there were no windows did not register for me as a problem; neither did the home’s deep eaves nor that it faced north and south sat in a valley surrounded by woods.

Bruce Wright

I am sorry to let you know, I saw that the light (figuratively speaking) once we closed on the house, and that was just about the only light we found in that house. We put in so many windows and light tubes, which surely helped, but the overall lack of light was an eye-twitch-inducing source of frustration to me. True, I was sensitive to temptation from sunlight and a bit claustrophobic, but a troll could have suffered from seasonal affective disorder in the house.

My sister, Torey, pooh-poohed me. She recorded all the great things we’d done and our beautiful setting. I gently scratched in my neck and held my peace. A couple of weeks later we were watching a detective series and there was a suspenseful moment when a character is locked in a toilet and might or might not be dead. The detective runs up many flights of stairs, pounds on the door and must break down it.

“If the detective was running up the staircase, you were wondering if another man was dead, were not you?” I asked Torey later.

“Obviously.”

“Well, I wasn’t. I noticed that the stairwell didn’t have any windows, but there was a shaft of sun, and I was wondering if there was a skylight or when the gaffer had lit it unnaturally.” She simply stared at me, all the Pollyanna run dry. Several years later, when she was house hunting, she availed herself of my mania/expertise.

Emerick Architects

This well-placed window lighting a hall and is a beautiful focal point.

If you are in the market for a house, light may not be in your own checklist, but it should. Here are some things to think about:

1. What direction does the house face? Our new house still faces north, but it’s an open floor plan and is filled with windows, so every room and hall has indirect light constantly and direct light at least sometime in the day. The principal living areas and bedrooms all face the south, which here in Michigan allows passive solar energy throughout the winter. Throughout summer time the sun is so large that the light downstairs is indirect and beautiful but upstairs the bedrooms heat up considerably. I wouldn’t ever say we’ve got too much light, but I’ve invested in window coverings to allow us to temper our glorious prosperity.

2. What rooms do you use the most and when? Since we’ve got a wooded hill to the west, the hot and low light of the setting sunlight is filtered. My sister-in-law’s house faces west, but the majority of her living spaces were designed with large windows to take advantage of the lake views to the west. A line of trees to the south shelters the house in the summer from the beams of the intense summer sun.

Shannon Malone

3. What is the window scenario? What was so challenging about my prior home was that the lack of windows. The room shown here is dark, but the beautiful windows makes it feel as if you are in a tree house rather than a cave. Friends of ours designed and built a beautiful, light-filled house. In working out the floor plan, they opted to put their bathrooms and mudroom in the center of the house and hence without windows, an option they regret.

The window scenario goes both ways. Other friends have a house on a hill. A bank of windows in their living room showcases the magnificent view to the east and floods the room with morning light. It was all I could do to keep from throwing myself onto the (bright!) Floor, in a sense of wonder and envy. For my friend it was a nuisance — her blinded toddlers encounter each other while they played. She purchased a huge and expensive shade soon after they moved in.

When a house has an abundance of windows, assess whether you need to add window coverings to your budget. The cost for even the least expensive shades can be considerable.

Kanner Architects – CLOSED

A big corner window is perfect for a modern house.

If we were planning the new house, I made it crystal clear that maximizing natural light was overriding. (Picture Scarlett O’ Hara shaking her fist and swearing she’ll never be hungry again.)

Throughout the framing phase, the builder posted pictures online. The caption next to our great room stated, from the understatement of the century, “An unobstructed, naturally day lit open space was a priority for the homeowners.”

What about you personally? Did you consider light once you purchased your house? Did you overlook or dismiss another fundamental attribute? Tell your story in the Remarks.

See related